STEP BY STEP IN 3D PRINTING UltiMaker Cura 5.6.0
-Handbook-
This is a working version of a handbook for the needs of the project from the Erasmus+ Program “Step by step in 3D printing” with reference number 2023-1-RS01-KA210-VET-00015403 – project activity “Convert and Print”.
Autor: Vladimir Pilipovikj
SOU “GoceDelchev”-Valandovo
Contents
2. Instalation and Language settings 3
3. Configure the Cura software settings according to our 3D printer 6
3.1. Import the 3D model into Cura. 10
3.4.10. Build Plate Adhesion 31
Intorduction
About handbook
This handbook provides detailed instructions (including pictures) for installing the software and configuring it according to the user’s specific 3D printer and printing requirements. Additionally, it explains various features and functionalities of the software, including importing 3D models, adjusting print settings, and optimizing the printing process for different materials and desired outcomes. This handbook is designed for the needs of the project “Step by Step in 3D printing”.
What is Cura?
Cura is an open source slicing application for 3D printers.
Ultimaker Cura works by slicing the user’s model file into layers and generating the printer-specific g-code.Users can prepare and slice 3D models for printing, as well as customize and optimize print settings for a variety of 3D printers and materials. Once finished, the g-code can be sent to the printer for the manufacture of the physical object. Cura is a powerful and user-friendly 3D printing software with numerous useful features and capabilities.
Cura is available under LGPLv3 license. Cura was initially released under the open source Affero General Public License version 3, but on 28 September 2017 the license was changed to LGPLv3. This is the preferred 3D printing software for Ultimaker 3D printers, but it can be used with other printers as well.
The open source software, compatible with most desktop 3D printers, can work with files in the most common 3D formats such as STL, OBJ, X3D, 3MF as well as image file formats such as BMP, GIF, JPG, and PNG.
Ultimaker Cura is supported by operating systems that are actively maintained by their software manufacturer or community. This currently means that ‘Windows 7’ and ‘MacOS 10.14’ are no longer supported.
Compatible operating systems:
Windows 10 or higher, 64-bit
Mac OSX 11 Big Sur or higher, 64-bit
Linux, 64-bit
Installation and Languagesettings
Cura is free software and you can download it directly from the Ultimaker website at the following link https://ultimaker.com/software/ultimaker-cura/. As I mentioned in the software description, it works on multiple operating systems, so you should choose an installation that matches your operating system.

After downloading the installation follow the following steps.
Step 1
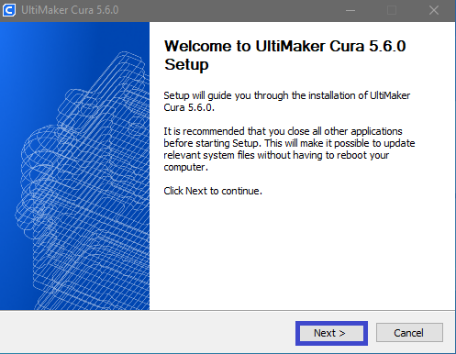 |
After starting the installation a welcome window will appear and it is recommended to firstly close the other applications before starting the installation. After closing the other applications click “Next” |
Step2
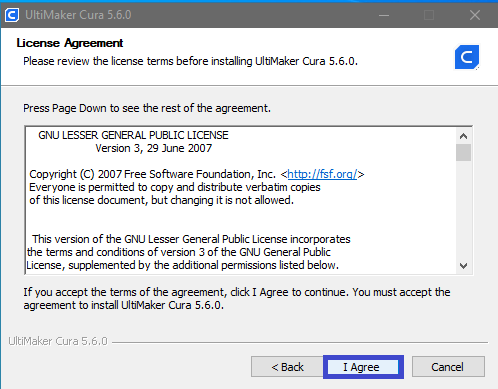 |
If you agree with the terms of use of the software, click “I Agree” |
Step 3
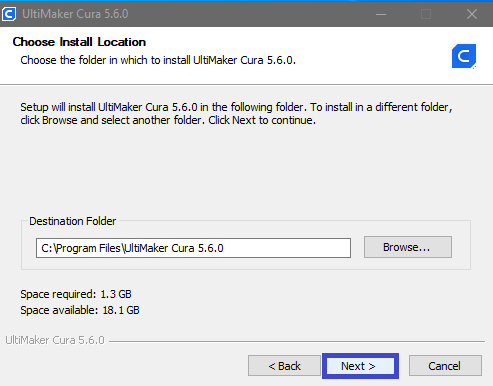 |
Choose the location and folder in which you want to install the software, than press “Next” |
Step4
 |
Select Start Menu Folder and click “Install” |
Step 5
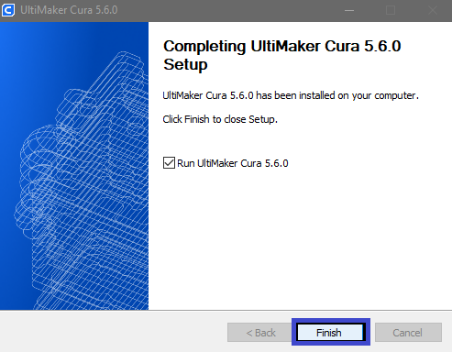 |
At the end, you will receive an information confirming that the installation is complete.You will also have the option to immediately start the software, depending on whether Run Ultimaker 5.6.0 is selected for you.
Click “Finish” |
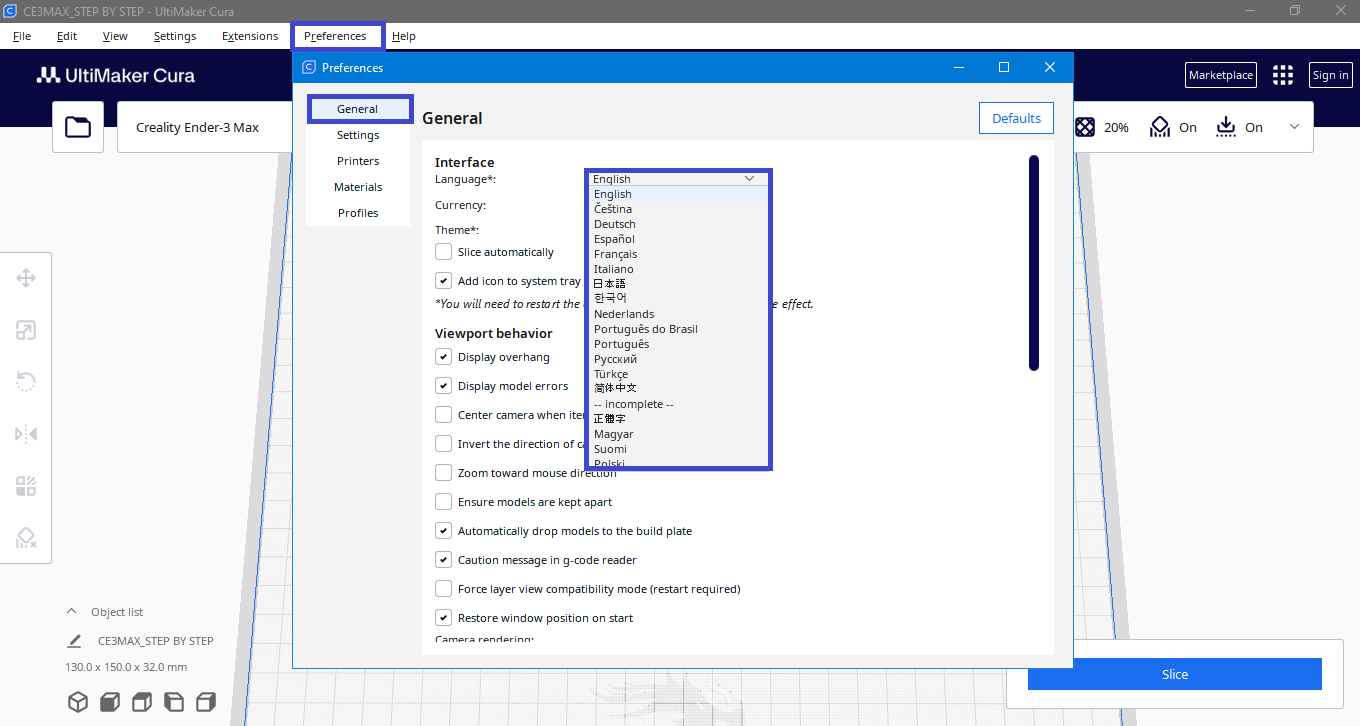
Language setting
Cura will automaticly pick the language of your operating system, but you can change it.
Configure the Cura software settings according to our 3D printer.
After starting the software you need to select your 3D printer. Cura offers you a wide range of FDM 3D printers from different manufacturers, but if you don’t find your 3D printer, you can make a configuration yourself according to the parameters of the printer you have.
Step 1: Select the manufacturer of your 3D printer
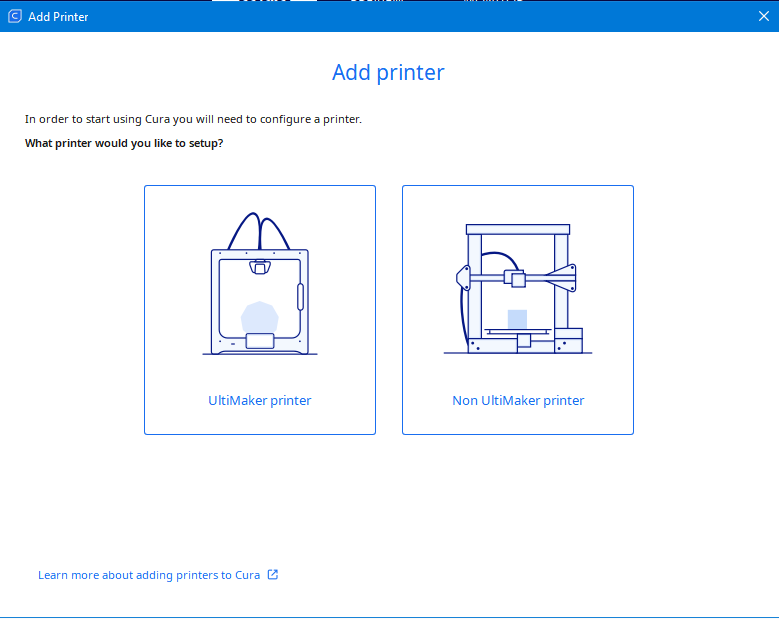 |
If your 3D printer is manufactured by Ultimaker, then select Ultimaker printer, if not, select Non Ultimaker printer.
Note: The printer we are going to deal with in this manual is non Ultimaker printer. |
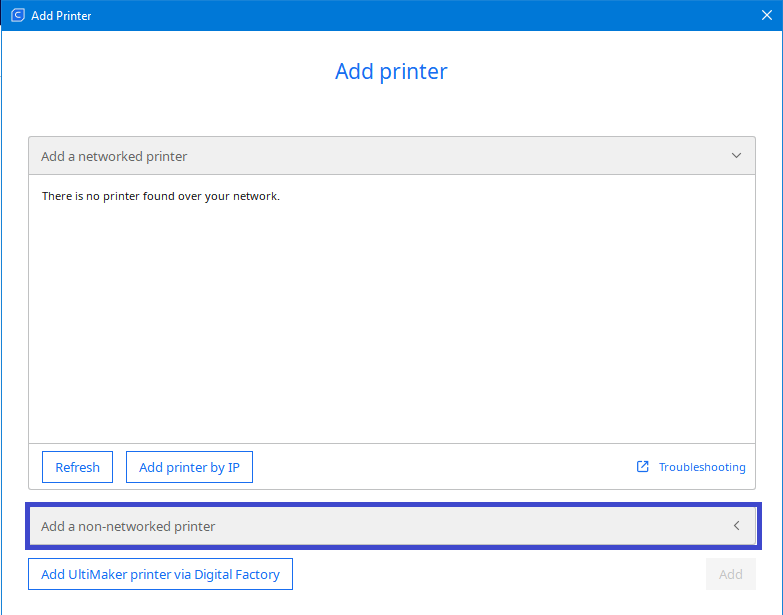 |
If your printer is networked with your computer then it will appear automatically.
If it is not, then select “Add a non-networked printer” |
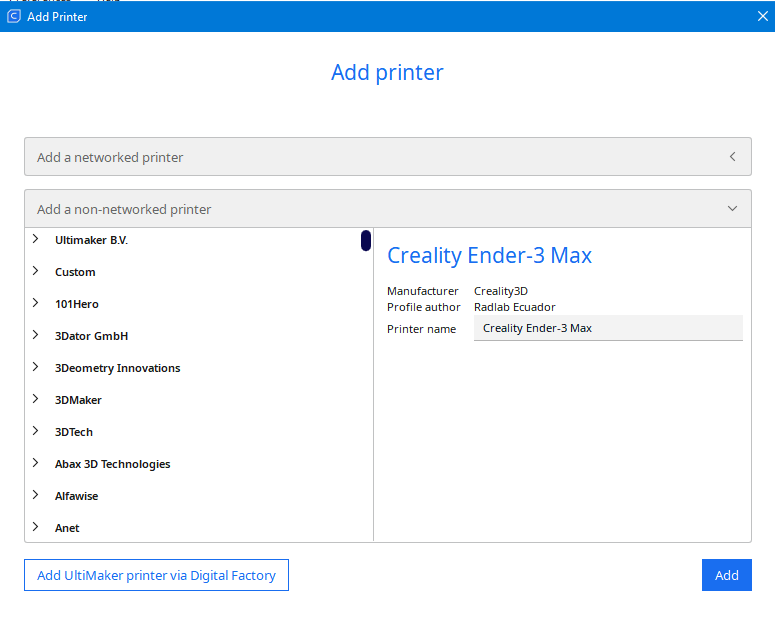 |
On the left side are the manufacturers of 3D printers and on the right side you have the name of the 3D printer. |
Step 2: Choose your 3D printer
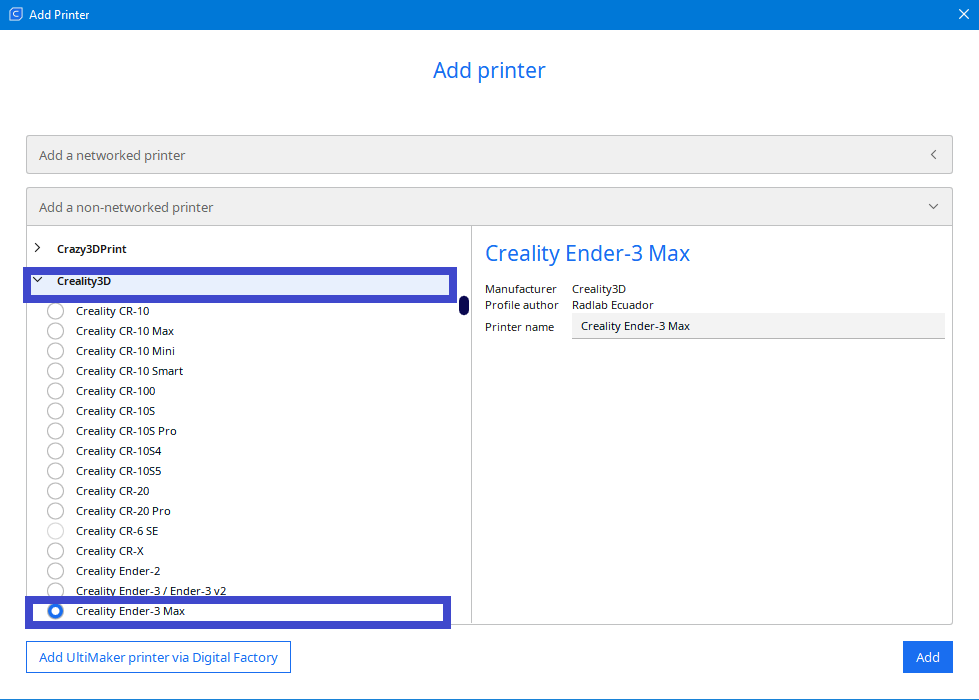 |
We select our 3D printer and click “Add”
Note: The printer we are going to deal with in this manual, is Crealiti Ender 3 max |
Step 3: Configuration of your 3D printer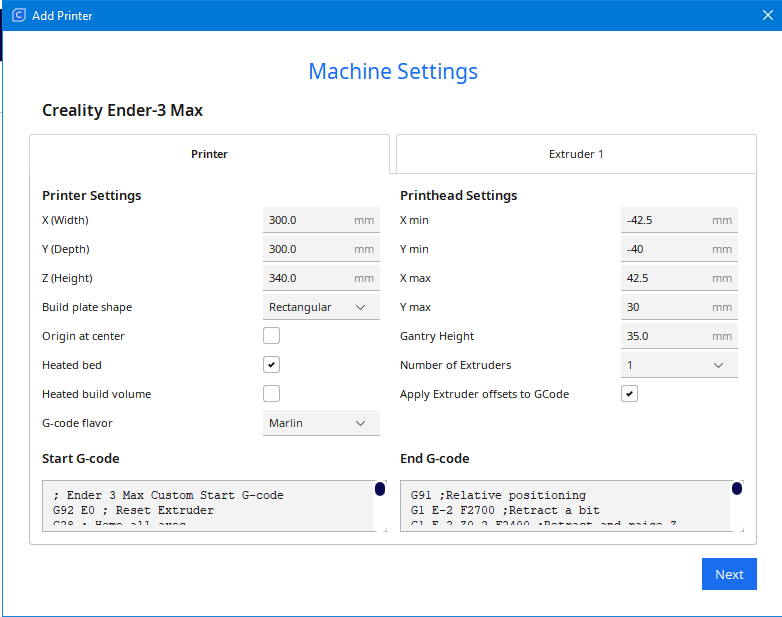
The software automatically displays the parameters for your 3D printer. If, by chance, they do not match the parameters given by the manufacturer, you have the opportunity to change them. If everything is fine, click “Next”
Note: The dimensions for the X,Y and Z axis should never be larger than the actual values of the 3D printer.
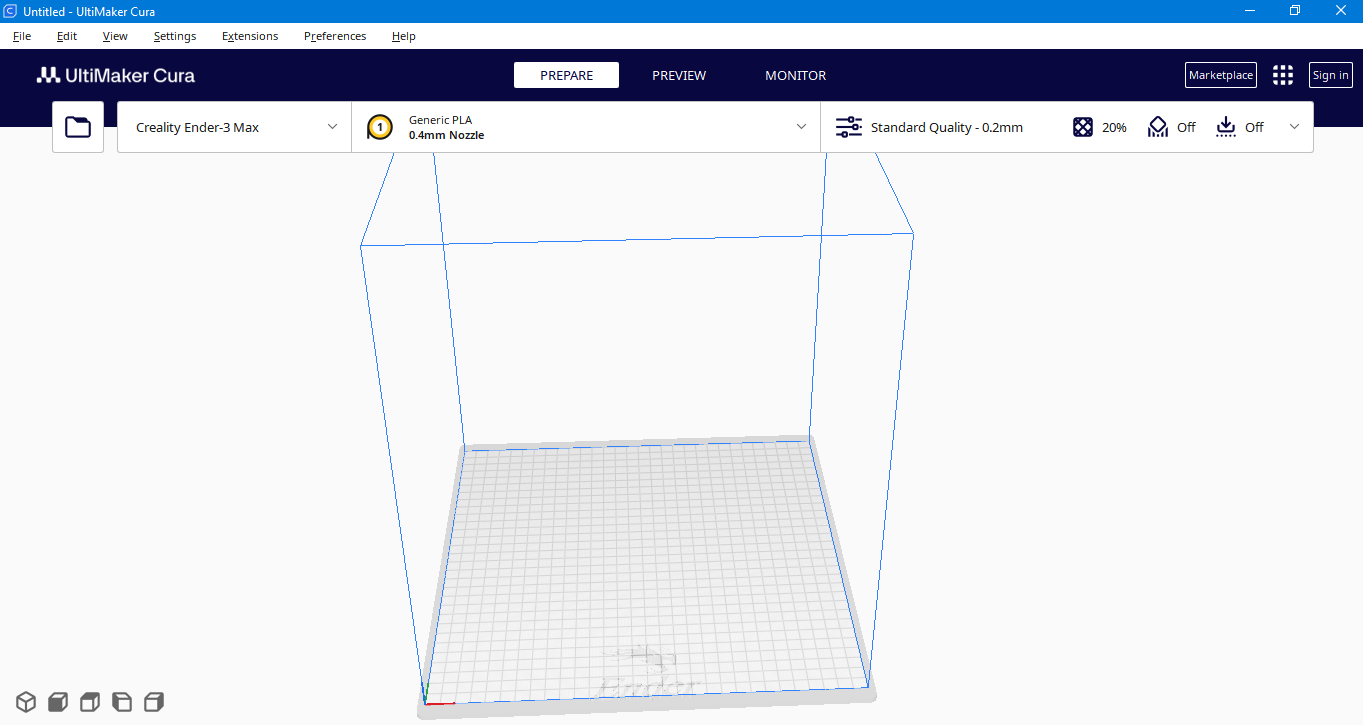
Step 4: Selection of material for printing.
After starting the software, you need to select the material you will print with. Cura offers you a large selection of printing material such as ABS, PLA, PETG, TPU, PVA
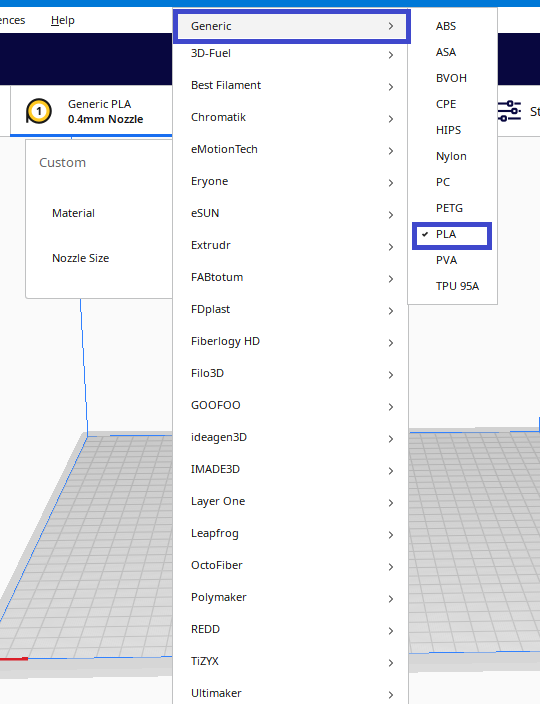
Note: We use PLA filament.
Step 5: Selection of nozzle size
Select the size of the nozzle from your 3d printer.
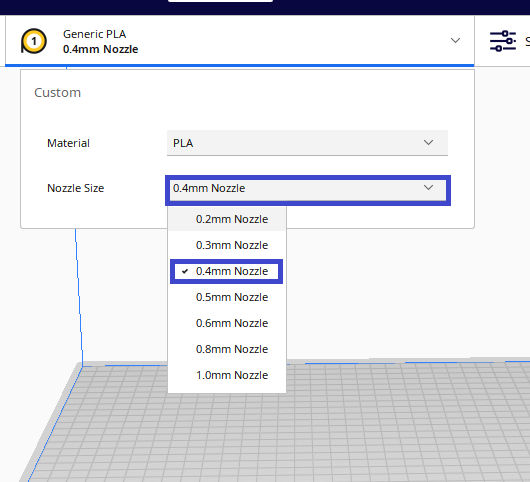
Note: The nozzle of our 3D printer is 0.4mm
Import the 3D model into Cura.
Before importing the 3D model into the software, ensure that your model has been converted to one of the following formats: STL, OBJ, X3D or 3MF. These are the formats supported by Cura.
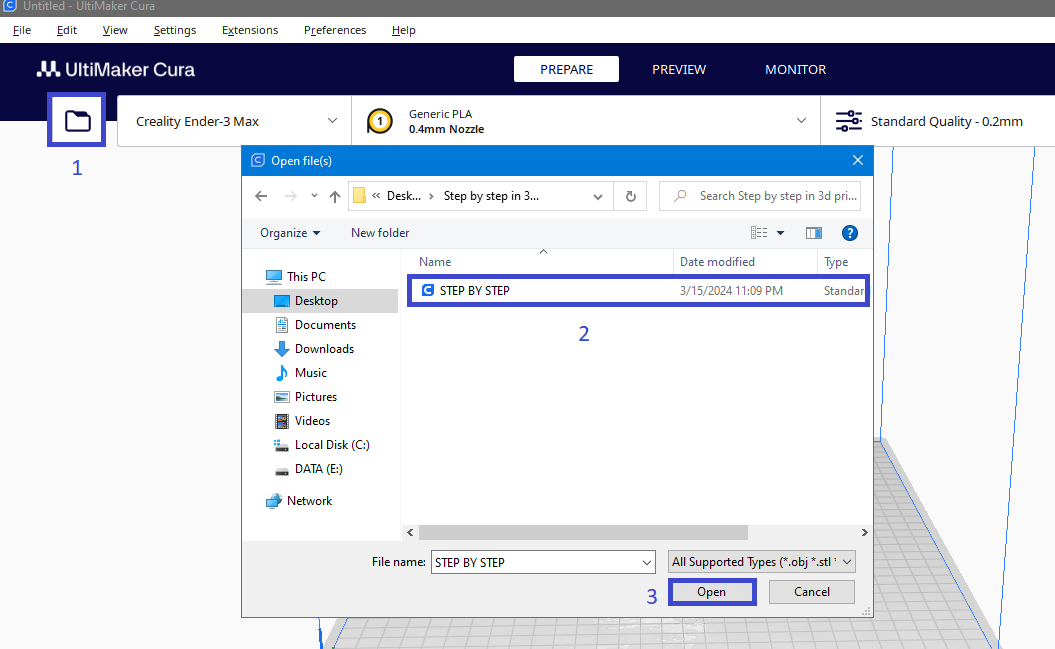
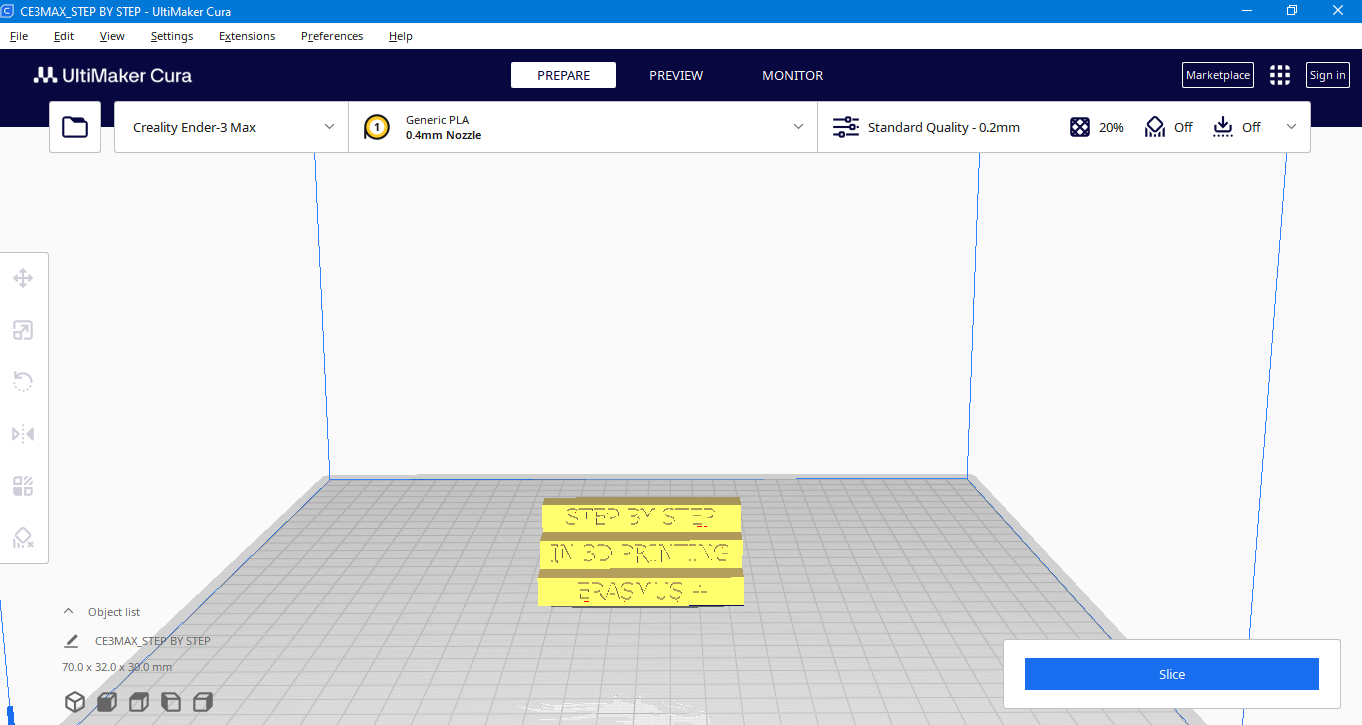
After you see the 3D model on the platform, you can start preparing it for 3D printing
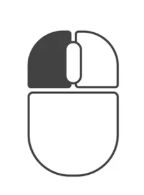
Navigation
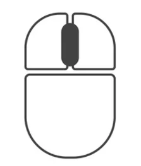
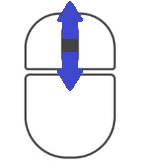
| Left Click – Select model | Right click- Orbit around scene | Middle mouse Button- Pan the viewport | Scroll in/out- Zoom the viewport |
 |
 |
 |
 |
Command in the window
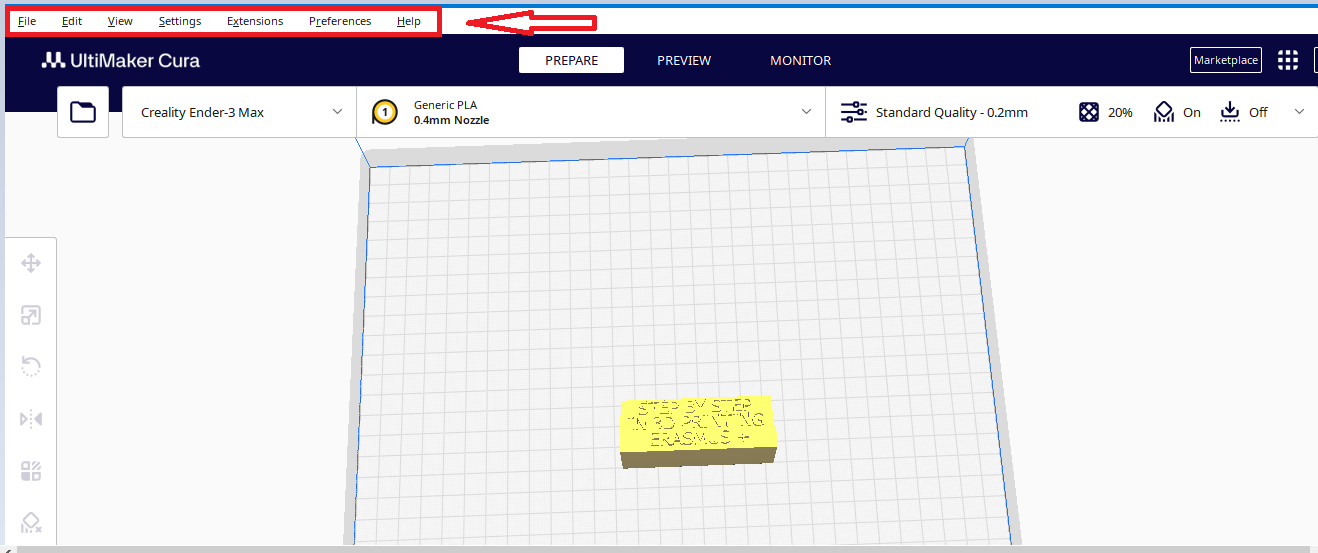
Top menu bar
The top menu bar includes the following options: File, Edit, View, Settings, Extension, Preferences and Help
File
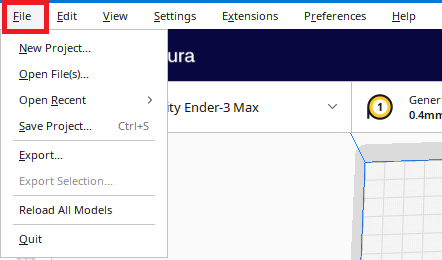 |
Clicking on File will open commands such as:
New Project– if you want to start a new project Open files– if you want to open an already existing model Open recent– if you want to open a model you have previously worked on Save project– if you want to save the project you are currently working on Export-if you want to export the model in another format Quit– if you want to exit the program |
Edit
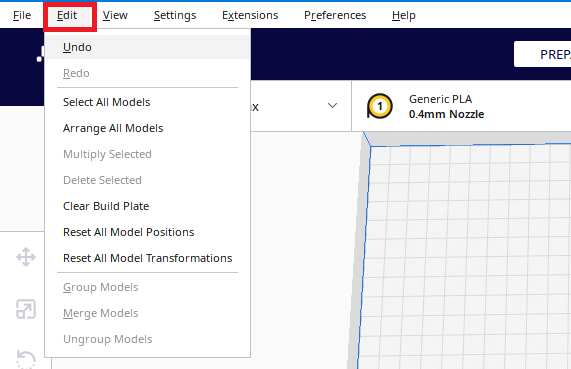 |
Clicking on Edit opens up options such as (undo) canceling a given command and returning to the previous state of the model.
(“Undo” can also be done by pressing ctrl+z on the keyboard.) Other options are described below in the section : left-click menu |
View
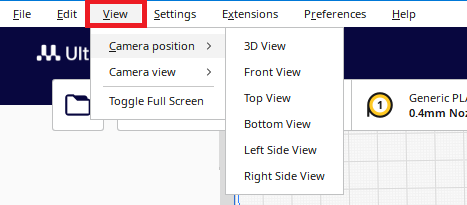 |
By clicking on view you have the opportunity to choose how to view the model, choose a position from which you will have the best view of the model |
Settings
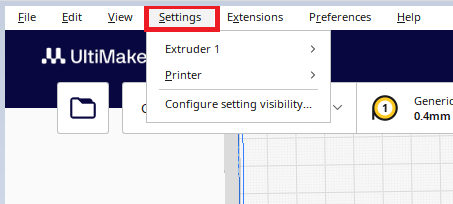 |
By clicking on Settings:
-In the Extruder 1 field you have the opportunity to change the size of the nozzle and change the material you are going to print with. -In the Printer field, you can choose the printer you will work with (if you have several printers available, then you should choose the printer with which you will print the model you are working on) |
Preferences
By clicking Preferences and Configure Cura you have the ability to make all the changes described so far, on an advanced level.

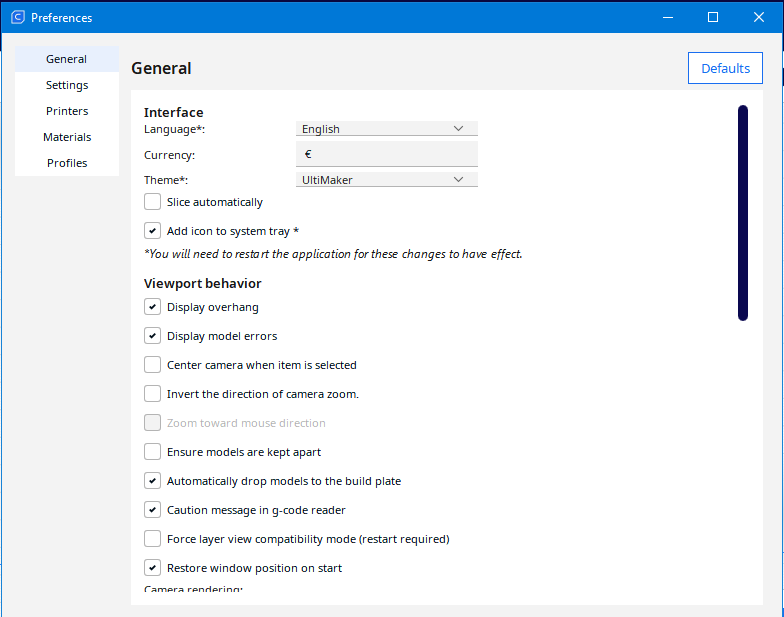
Operation bar
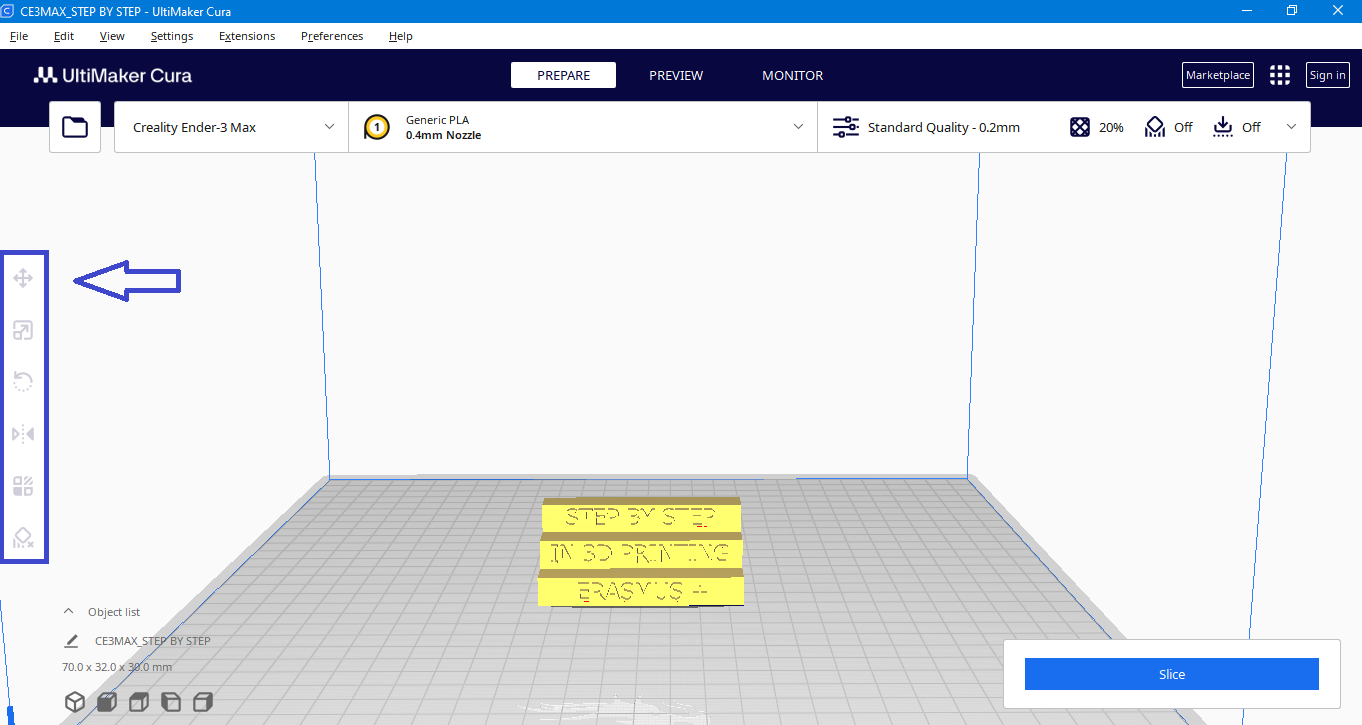
The operation bar includes the following functions: Move, Scale, Rotate, Mirror, Per Model Settings, and Support Blocker.
Before you can use these functions, the model must be selected.
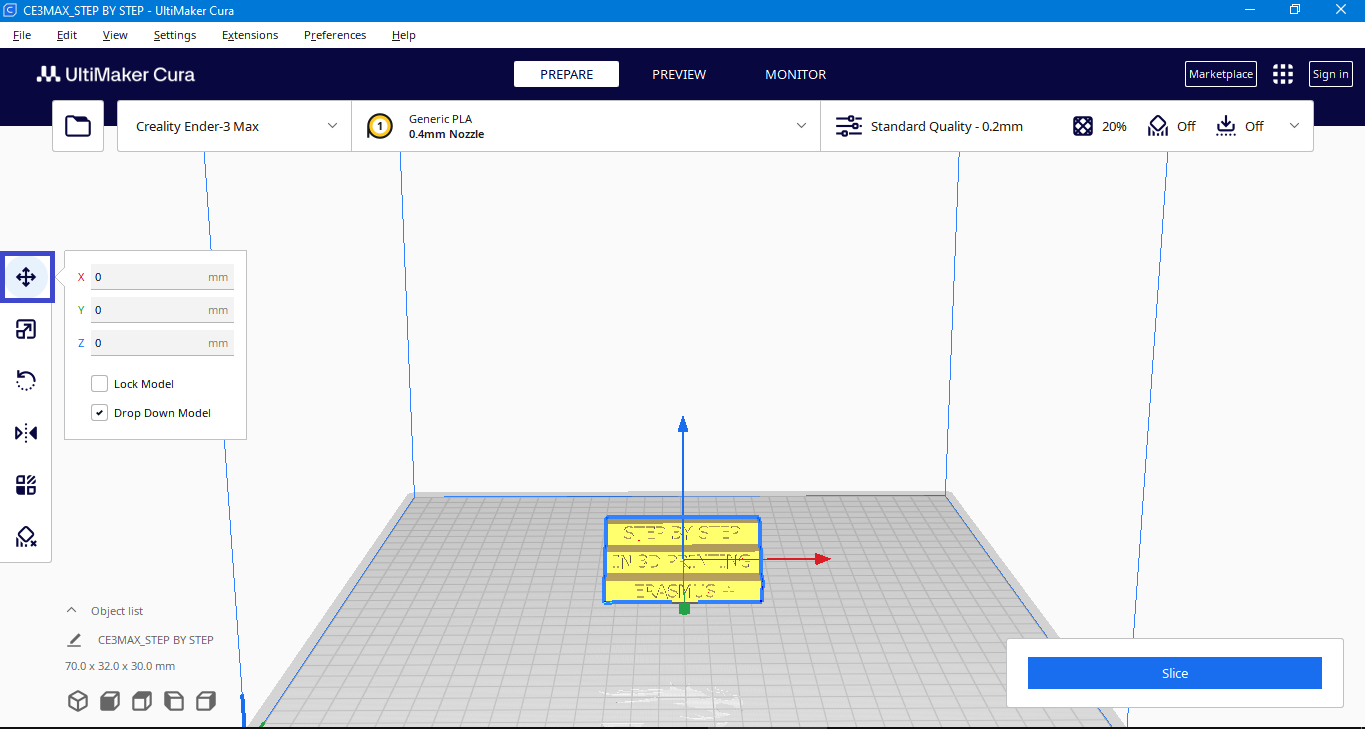
Move
Perform moving operations on the selected model, including X/Y/Z movement
Scale
Perform scaling operations on the selected model, including scaling in the X/Y/Z directions, switch or lock the Uniform for scaling, and reset operation.
NOTE: When importing models into Cura, it’s important to check the scale settings. Sometimes, the default scale might be different, (10x smaller) causing the model to appear smaller. You can adjust the scale in Cura to match the size of your model in the 3D modeling program you were using.
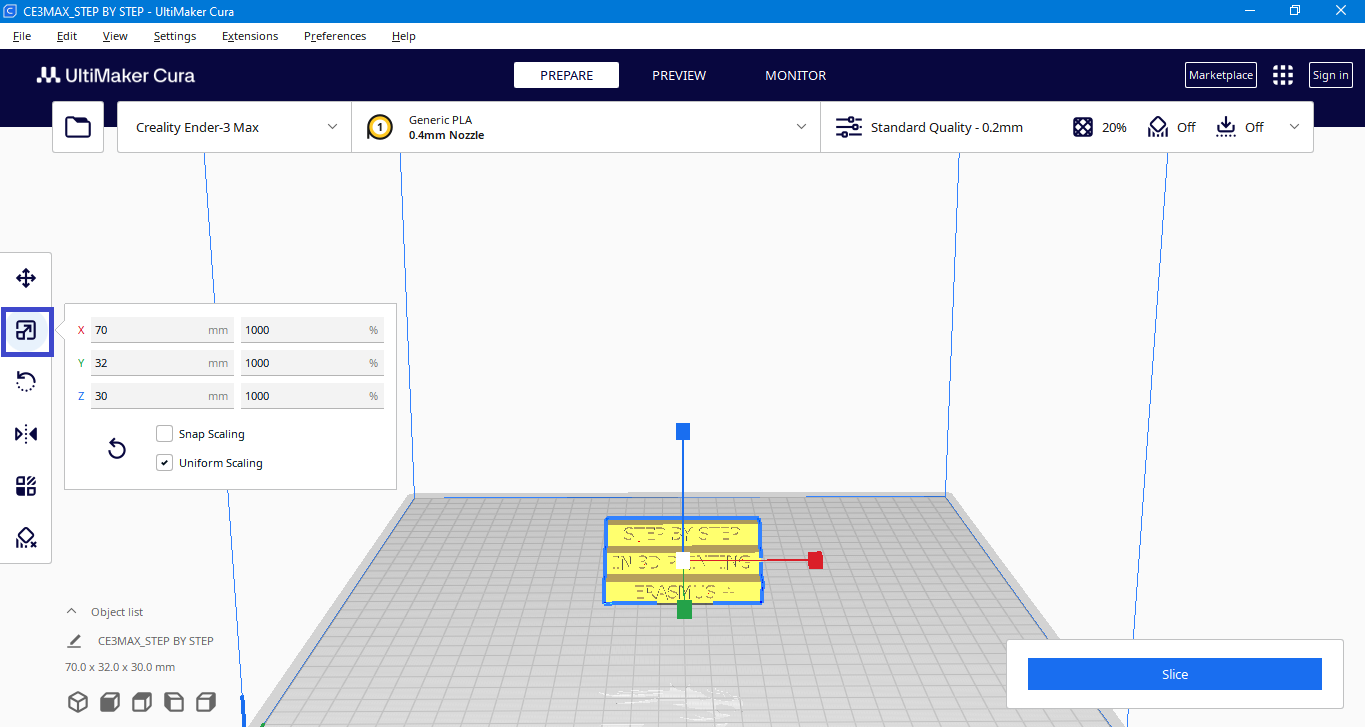
First select the model, then click on the Scale command (the box marked in red below the image). After you have done the previous steps, you have the option to resize the model in two ways. The first way, is to change the dimensions of the model in millimeters, while the second way is through changing the dimensions in percentages. The two ways of changing are related to each other, this means that if you change the dimension of the model in millimeters, the percentage value will automatically change, and vice versa.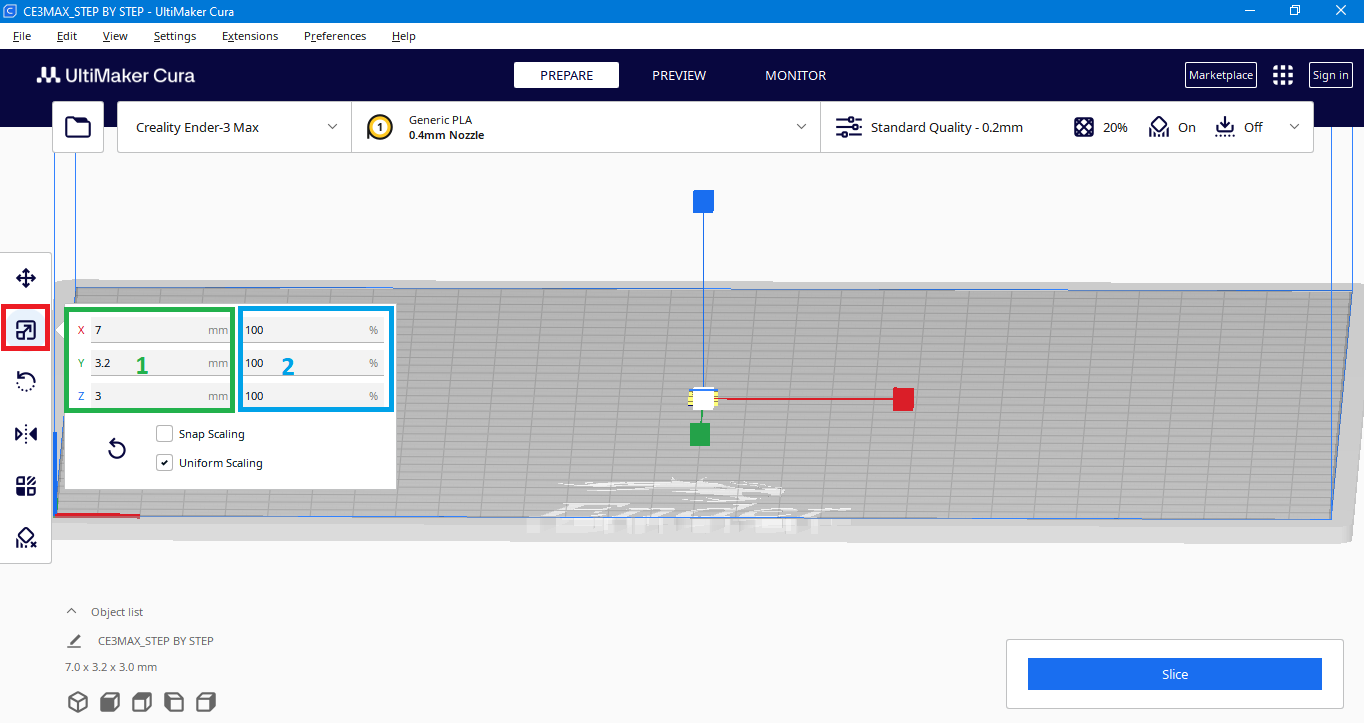
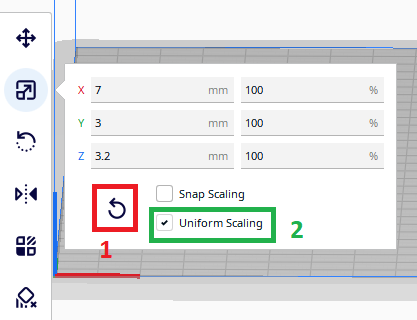
- Reset– Command for resetting the dimensions of the model, i.e. returning to the original dimensions of the model.
- Uniform Scaling – By selecting the uniform Scaling command when changing one dimension, the other dimensions will change linearly with the same amount as previously choosen, if the command is not selected then you can change the dimensions of the model for each size separately (X, Y or Z)
NOTE: Our model is 10 times smaller than the original one, so we will use the option to change the dimensions in percentages (100×10=1000%) with the Uniform Scaling field selected.
Rottate
Allows you to rotate the model as you wish, avoiding the need for support.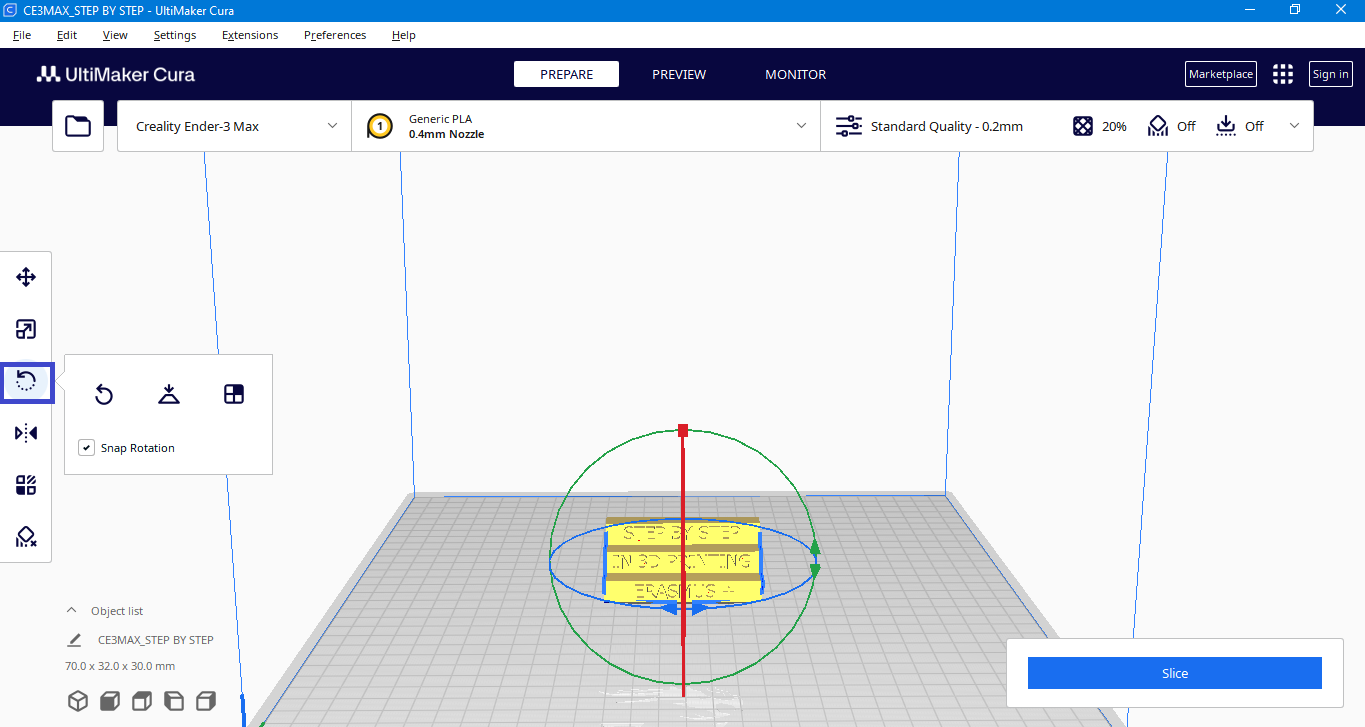
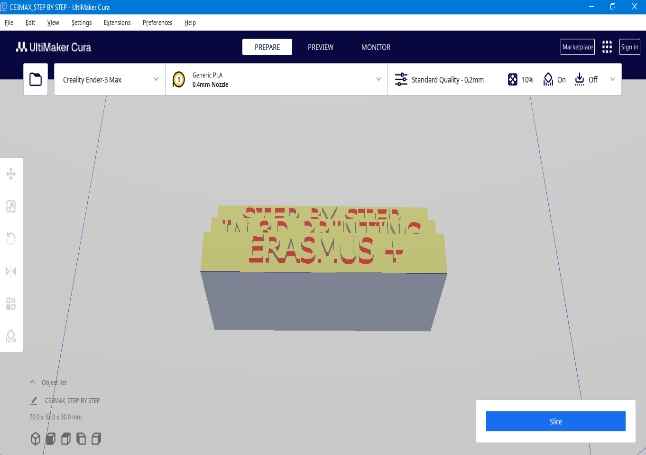
NOTE: If the model has some red colored parts, it indicates that those areas require support structures.To minimize the need for supports, adjust the model either by eliminating the red areas or minimize their presence.
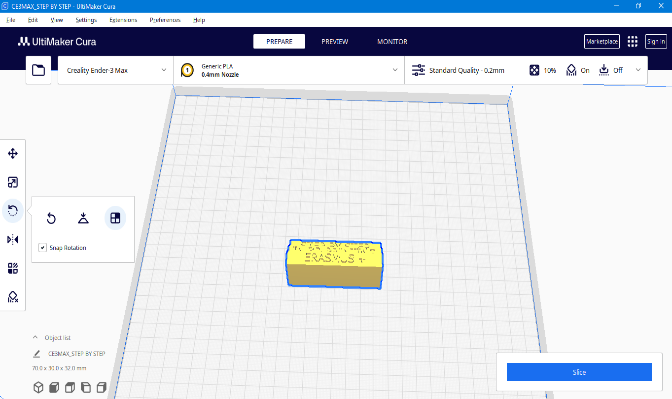
If you rotate this model you will notice that the letters on the bottom side are red colored, so we will flip this model so that there are no red parts on it.
 |
 |
Mirror
Allows you to mirror the model on all different axis.
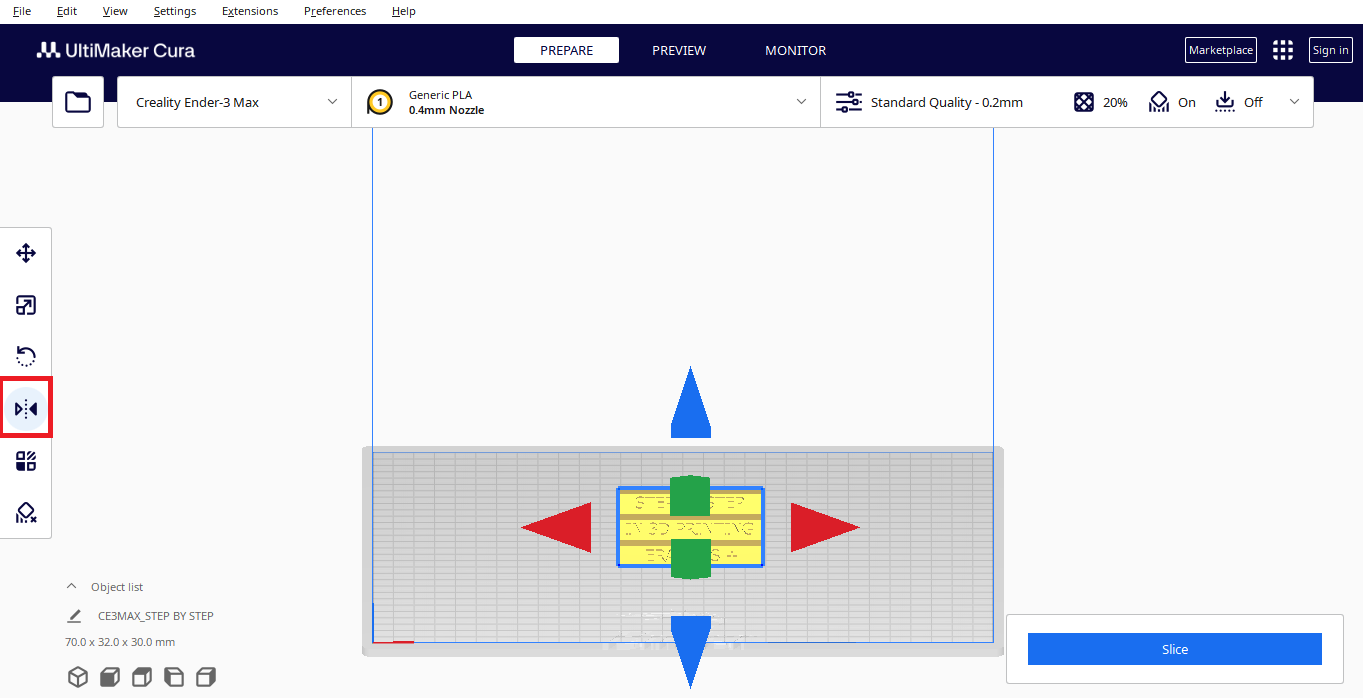
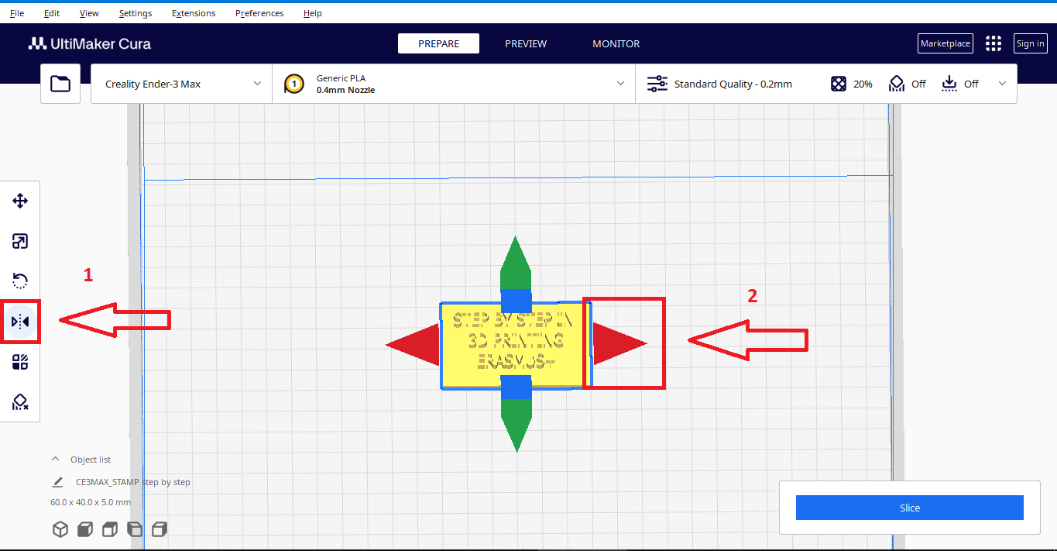
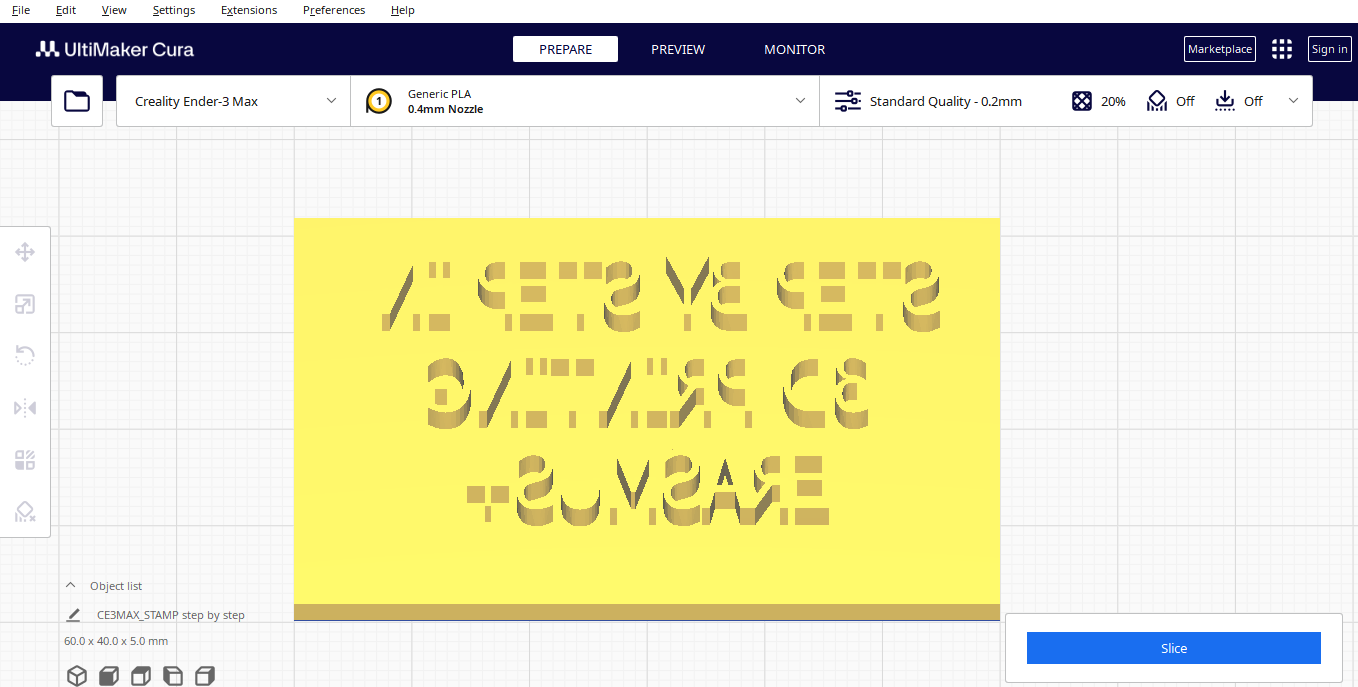
With this command you can flip the models, and, for example make them suitable for stamp.
Per model settings
Allows you to change the mesh type and settings of the models
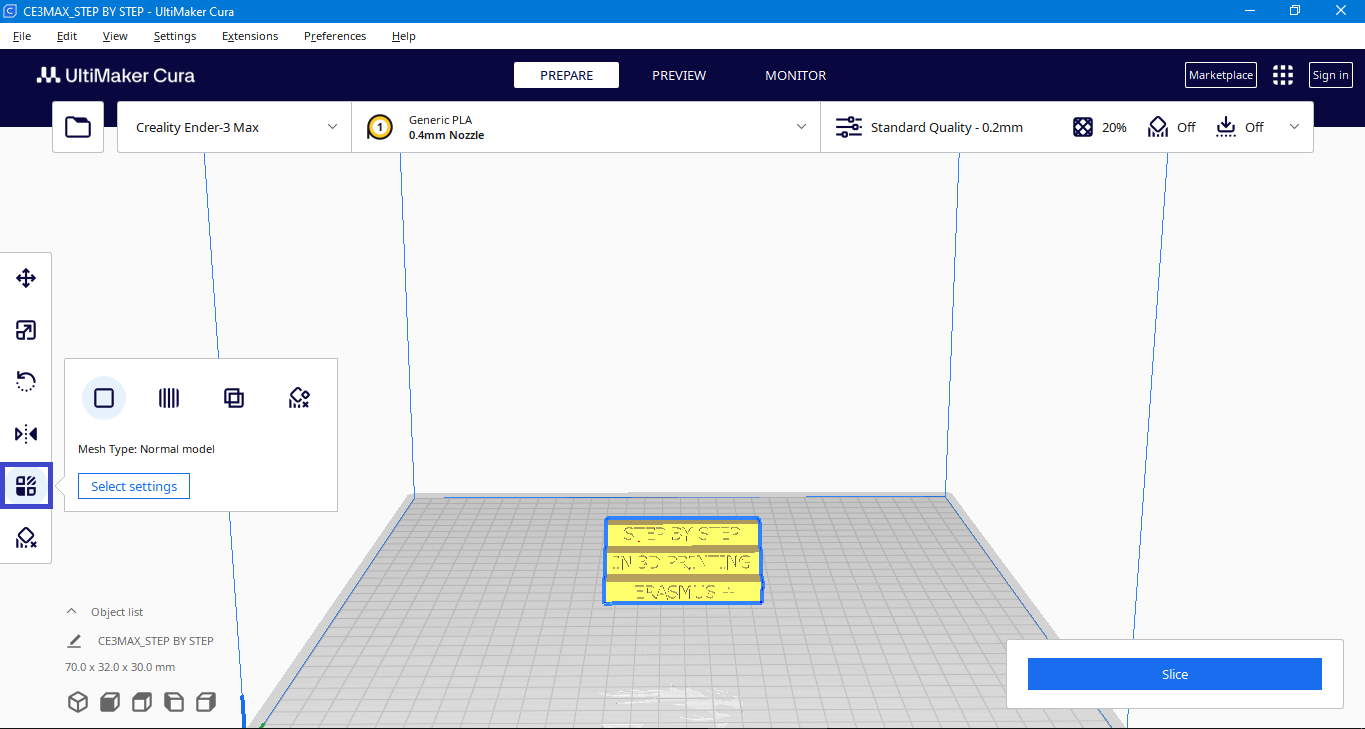
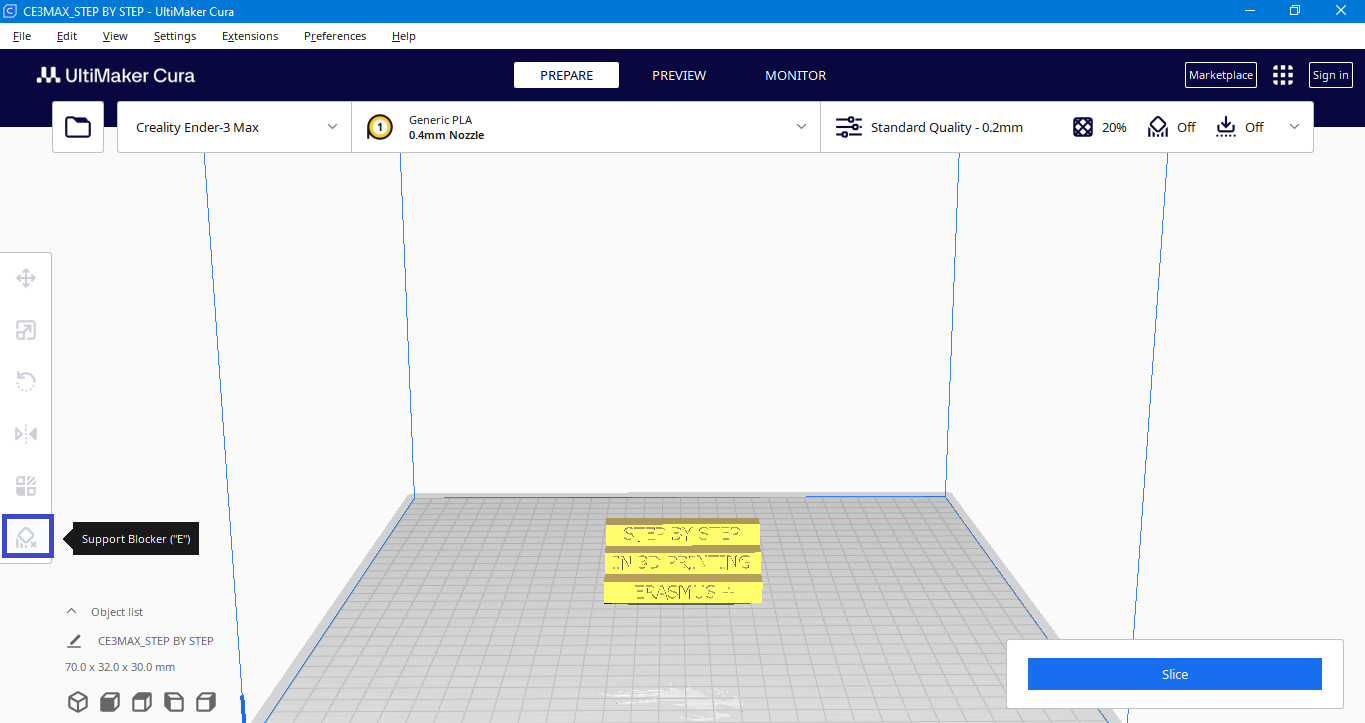
Support blocker
Allows you to block an area so that supports will not be generated.
Right click menu
Right-clicking on the model opens a menu in which you have several options
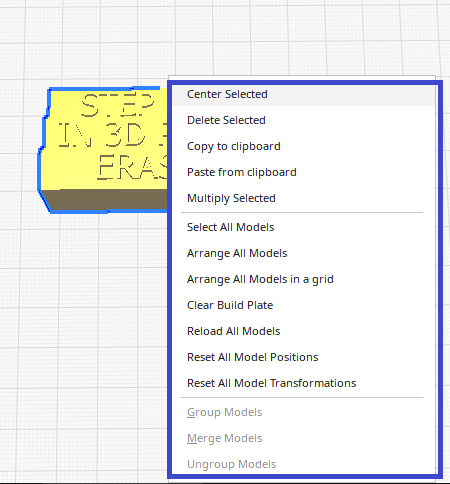 |
Center selected-positions the selected model in the middle of the printing plate
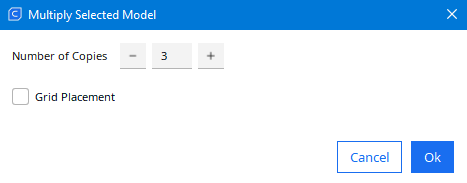
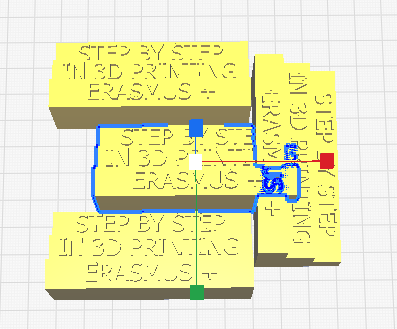
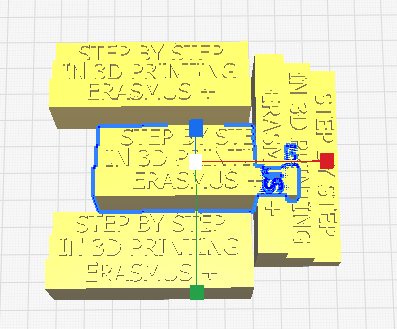
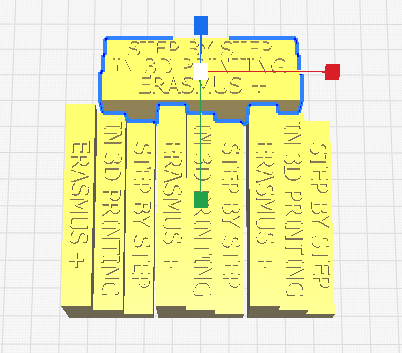
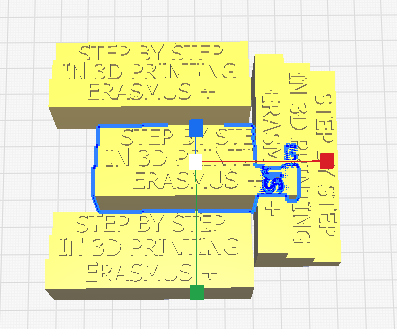
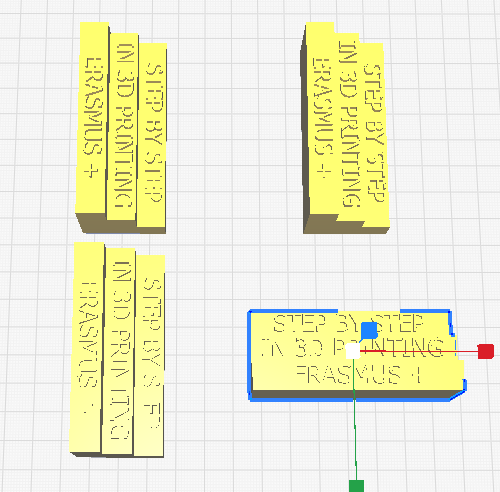
Multiply selected- number of copies of the model Arrange all models-arranges models next to each other to save Arrange all models in a grid- arranges the models at a certain distance from each other in a grid |
Multiplay
 |
► |  |
Arrange all models
 |
► |  |
Arrange all models in a grid
 |
► |  |
Print settings
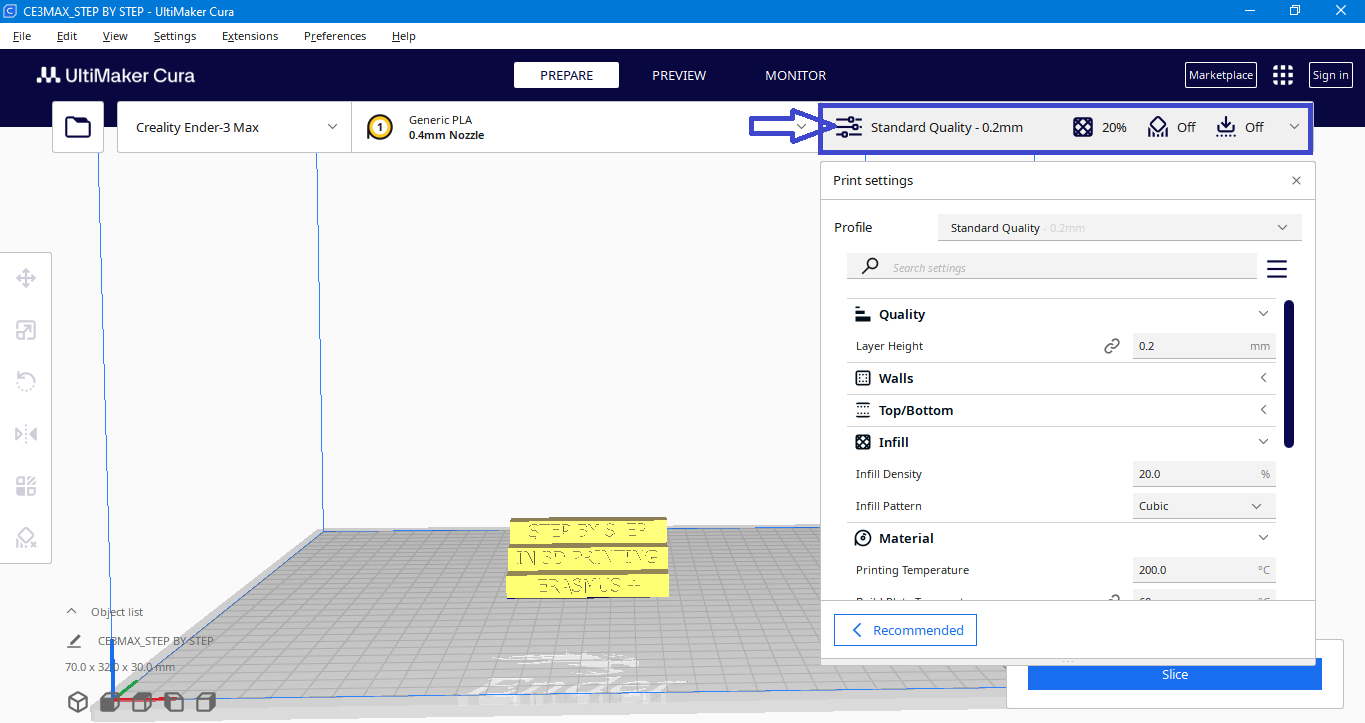
This is the field where you adjust the printing according to your needs.
3.4.1. Print Quality.
Here, you select the printing quality for your model, i.e., the layer height. You can choose from existing profiles where your previous print settings are saved, or create new ones with custom parameters.
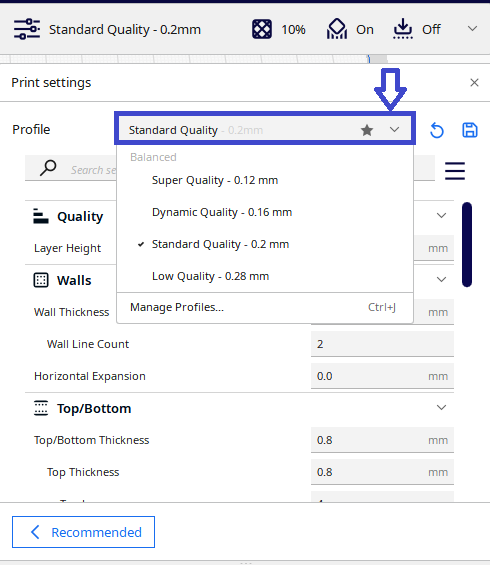
You can also enter the layer height manually in the “layer height” field.
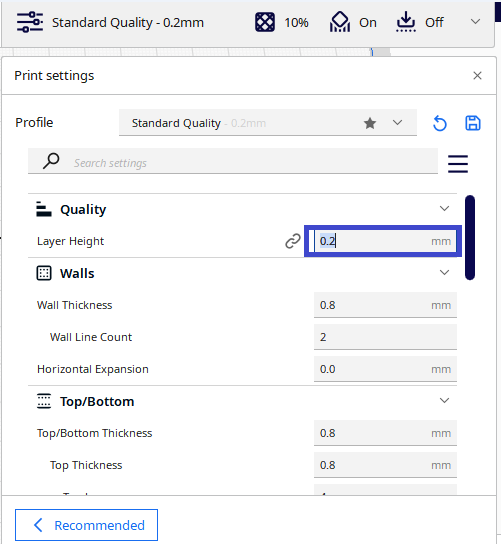
NOTE: Higher values produce faster prints in lower resolution, lower values produce slower prints in higher resolution.
For our model we use Standard Quality 0.2mm
3.4.2. Walls

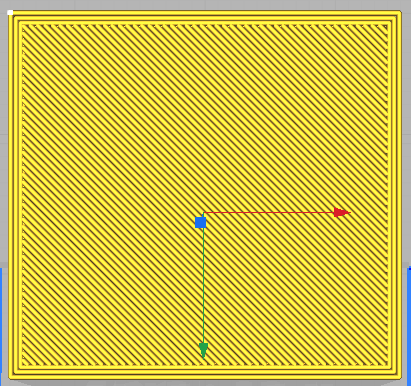
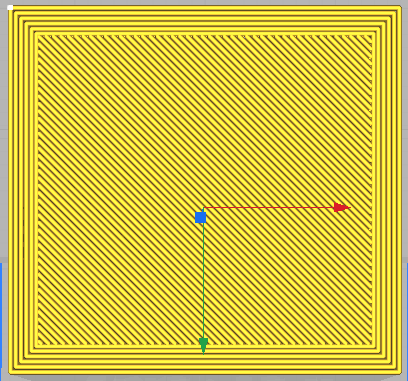
This is a field in which the thickness of the walls ars given before it starts to fill the inner part of the model, that is, the number of lines made by the extruder along the ends of the model. The two fields are dependent on each other, while both are dependent on the width of a layer.
.
 |
 |
| Wall Thickness 0.8mm
Wall Line count 2 |
Wall Thickness 2mm
Wall Line count 5 |
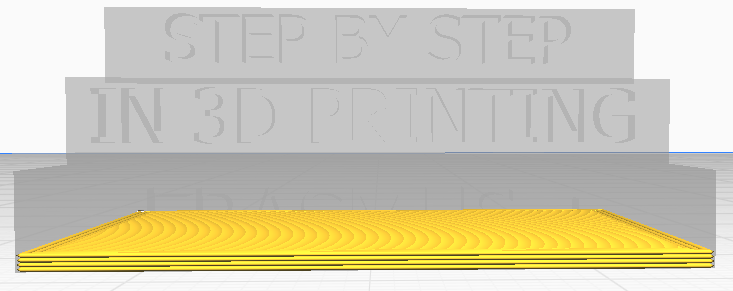
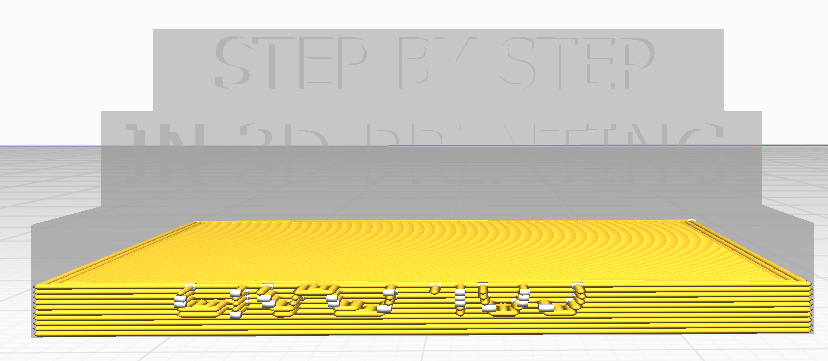
Top/Bottom
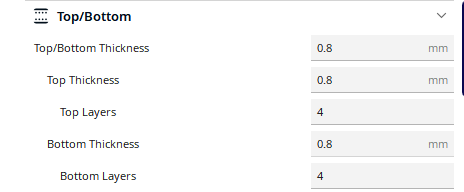
In this field you specify the thickness of the bottom and top of the model, that is, how many layers to make before the model starts to be filled. You have the option to set them with the same value, but also with different values for the top and the bottom.
 |
 |
| Bottom thickness 0.8mm
Bottom layers 4 |
Bottom thickness 2mm
Bottom layers 10 |
Infill

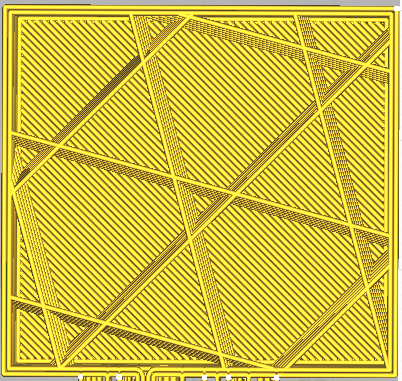
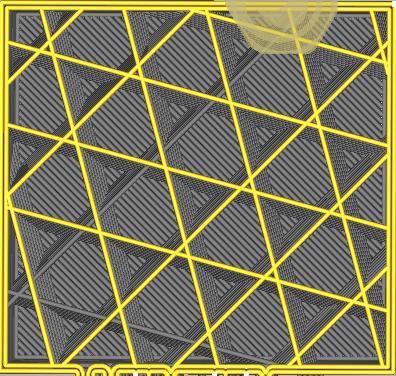
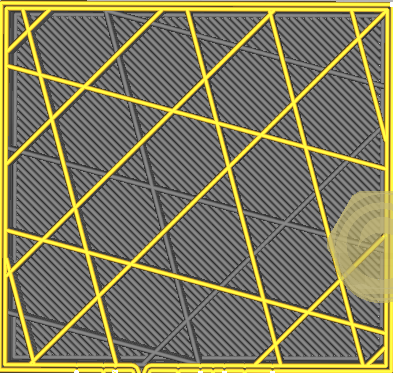
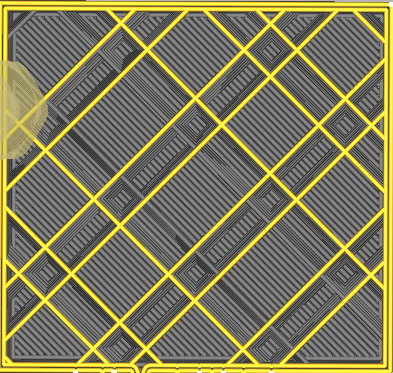
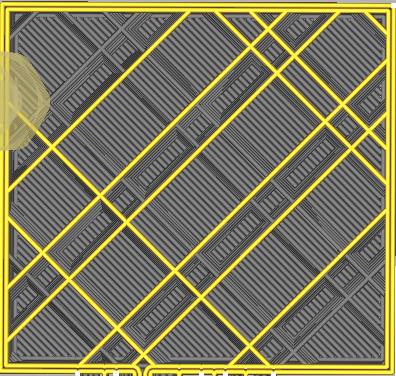
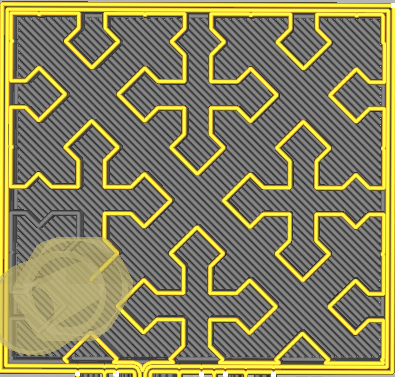
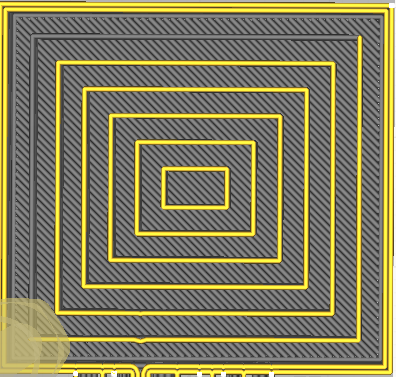
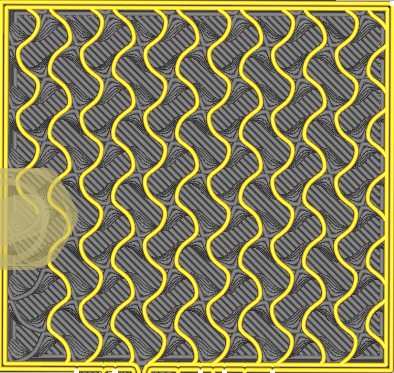
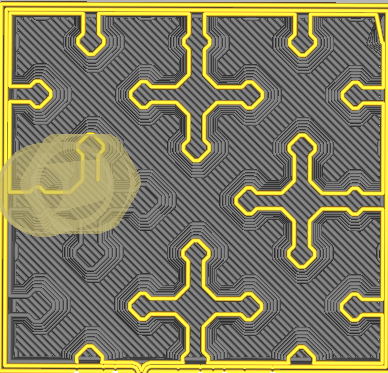
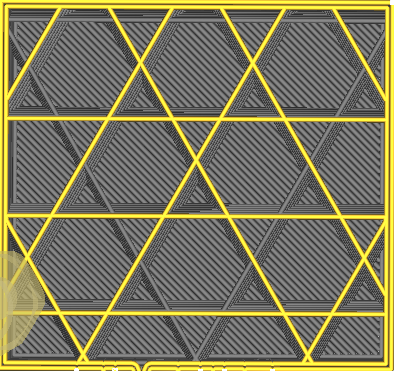
In this field you specify the infill density of the model in percent, and the shape of the fill. You have a choice of several patterns.
NOTE: The higher the percentage of infill, the more solid the model, it takes more material and more time to make, a lower percentage means less material (lighter model), and less time to make.
 |
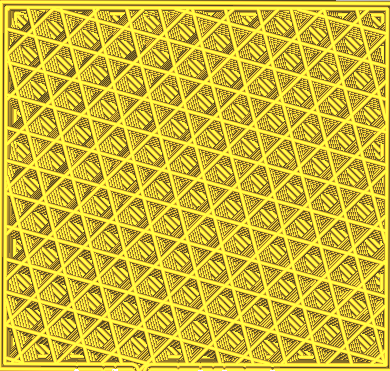 |
| Infill 10% | Infill 50% |
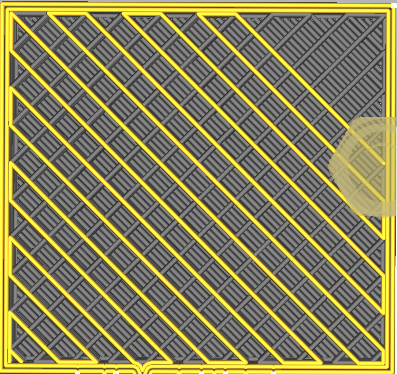
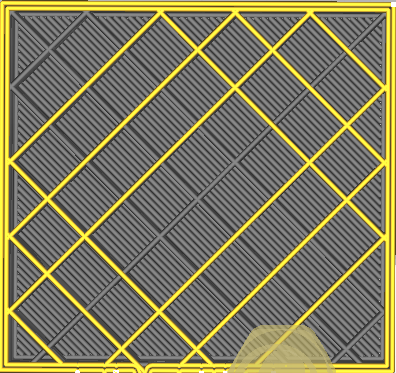
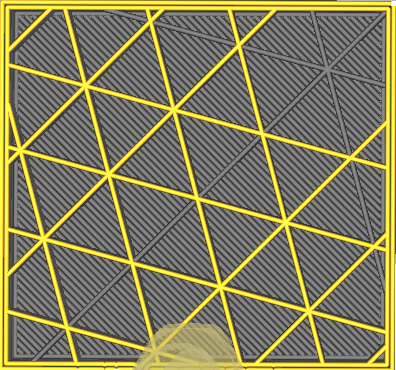
Infill pattern
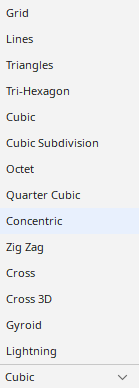 |
The pattern of the infill material of the print.
|
 |
 |
| Lines | Zig-Zag |
 |
 |
| Grid | Triangles |
 |
 |
| Cubic | Tri-Hexagon |
 |
 |
| Octet | Quartet Cubic |
 |
 |
| Cross | Concentric |
 |
 |
| Gyroid | Cross 3D |
 |
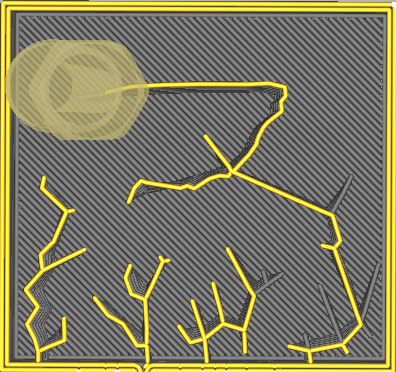 |
| Cubic Subdivision | Lighting |
Materials

In this field you enter the temperature of the nozzle and the temperature of the bed (if the 3D printer you are working with has a heated bed).
The temperature of the nozzle and bed depends on the type of material you are printing with.
| Material | PLA | TPU | ABS |
| Printing temperature | 180 ºC to 230 ºC | 210 ºC to 230 ºC | 240 ºC to 260 ºC |
| Build Plate Temperature | 40 ºC to 60 ºC | 30 ºC to 60 ºC | 95 ºC to 110 ºC |
Note: The temperature depends on the conditions in which you print.
Note: The 3D printer we will print on is not closed. Since we will print in conditions where there will be movement of people, the maximum temperatures are recommended because there is a flow of air that cools the filament and deformation of the printed object can occur.
Speed

The speed at which printing happens
The optimal print speed for your object depends on your priorities, preferences, and printer’s capabilities.Lower print speeds can improve surface quality, dimensional accuracy, and precision, but they also increase the printing time and the risk of clogging and jamming. Higher print speeds can reduce printing time and material consumption, but they also degrade surface quality, dimensional accuracy, and precision.
Travel

Retract the filament when the nozzle is moving over a non-printed area
Retraction is a feature meant to eliminate stringing by pulling back filament when the printhead moves to a new location.
Cooling

Enables the print cooling fans while printing. The fans improve print quality on layers with short layers times and bridging/overhangs.
Support
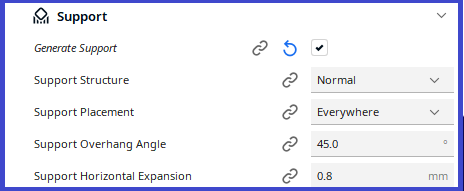
Generate structures to support parts of the model which have overhangs. Without these structures, such parts would collapse during printing.The software will color in red, the part that is hanging, and that needs a support.
Support structure
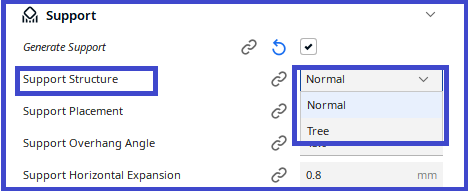
Chooses between the techniques available to generate support.
Normal support creates a support structure directly below the overhanging parts and drops those areas straight down.
Tree support creates branches towards the overhanging areas that support the model on the tips of those branches, and allows the branches to crawl around the model to support it from the build plate as much as possible.
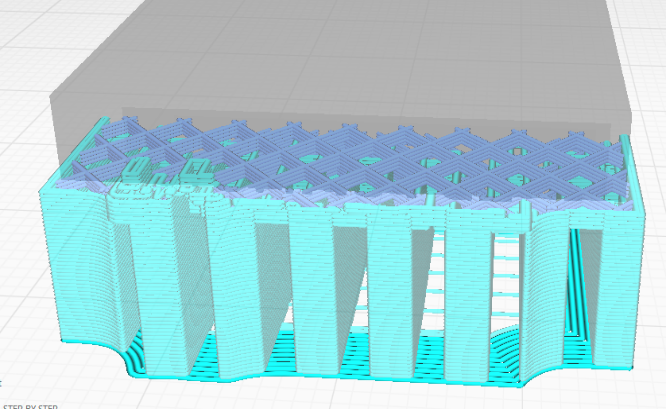 |
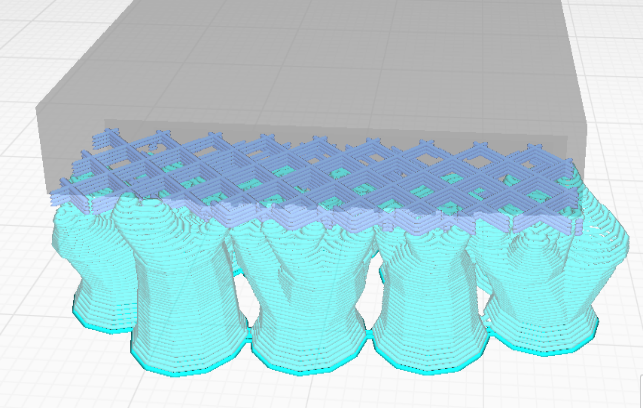 |
| Normal support | Tree suport |
Support placement

Adjust the placement of the support structures. The placement can be set to touching build plate or everywhere. When set to everywhere the support structures will also be printed on the model.
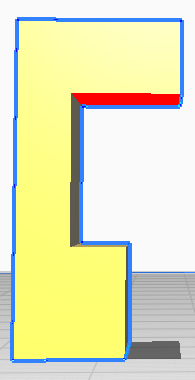 |
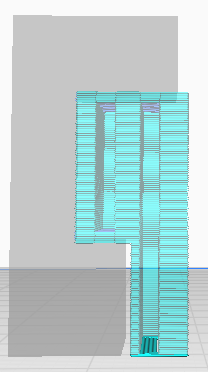 |
 |
| Without support | Everywnare | TuchingBuildplate |
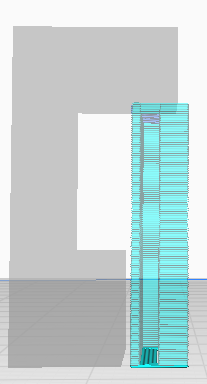
Support Overhang Angle
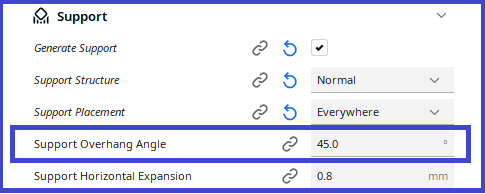
The minimum angle of overhangs for which support is added. At a value of 0º all overhangs are supported, 90º will not provide any support.
Support Horizontal Expansion
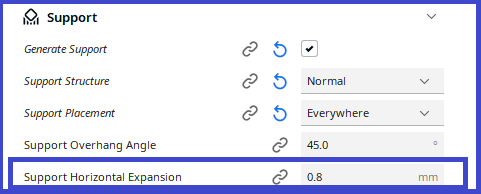
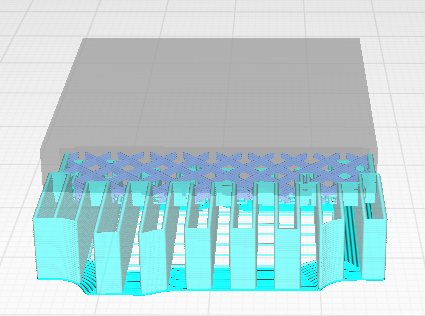
Amount of offset applied to all support polygons in each layer. Positive values can smooth out the support areas and result in more sturdy support.
 |
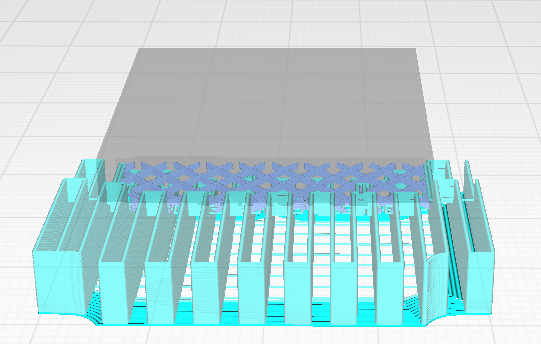 |
| Support Horizontal Expansion 0.8mm | Support Horizontal Expansion
5mm |
Build Plate Adhesion

This option is suitable if you are printing a larger object.
When larger objects are printed, larger temperature shocks occur, which tend to twist the object and detach it from the printing platform. In order to avoid these problems, Build plate Adhesion is used, with which the object covers a larger area with the build (printing) plate and avoids the object from detaching.
Different options that help to improve both priming your extrusion and adhesion to the build plate.
Brim adds a single layer flat area around the base of your model to prevent warping.
Raft adds a thick grid with a roof below the model.
Skirt is line printed around the model, but not connected to the model.
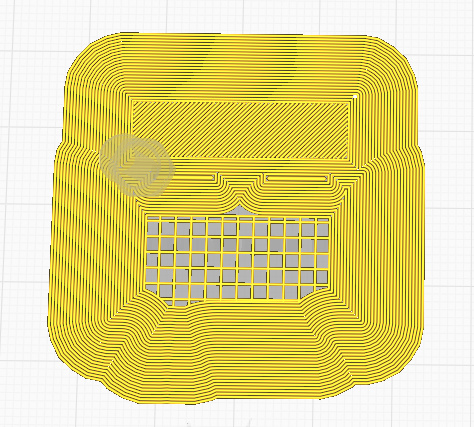 |
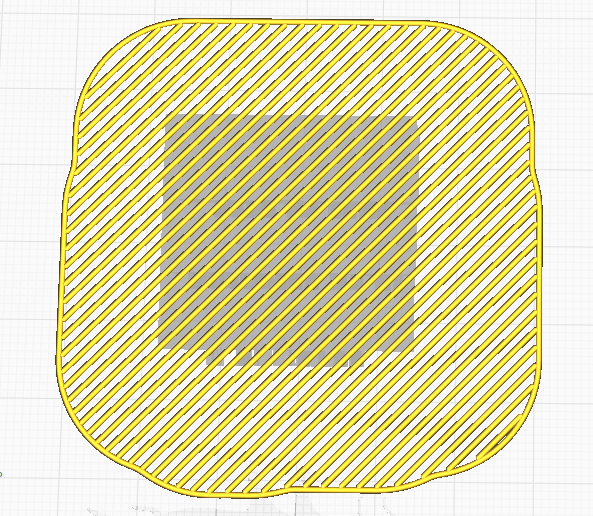 |
 |
| Brim | Raft | Skirt |
Advanced settings
The previously mentioned settings are basic, if you need more settings you can always include additional options.
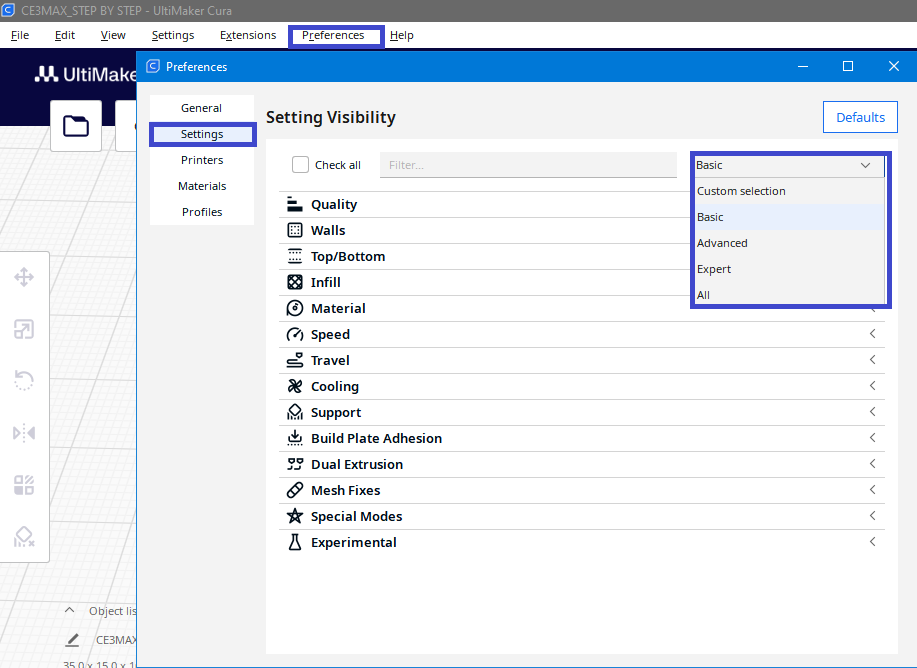
To turn on the additional options, click preferences, then select the Settings,and you will see all the settings available in Cura. You can choose from already existing profiles, or you can configure yourself with selection of the setting. After you select the settings they will appear in the print settings.
Slice
After you have made all the necessary settings for your model click slice.
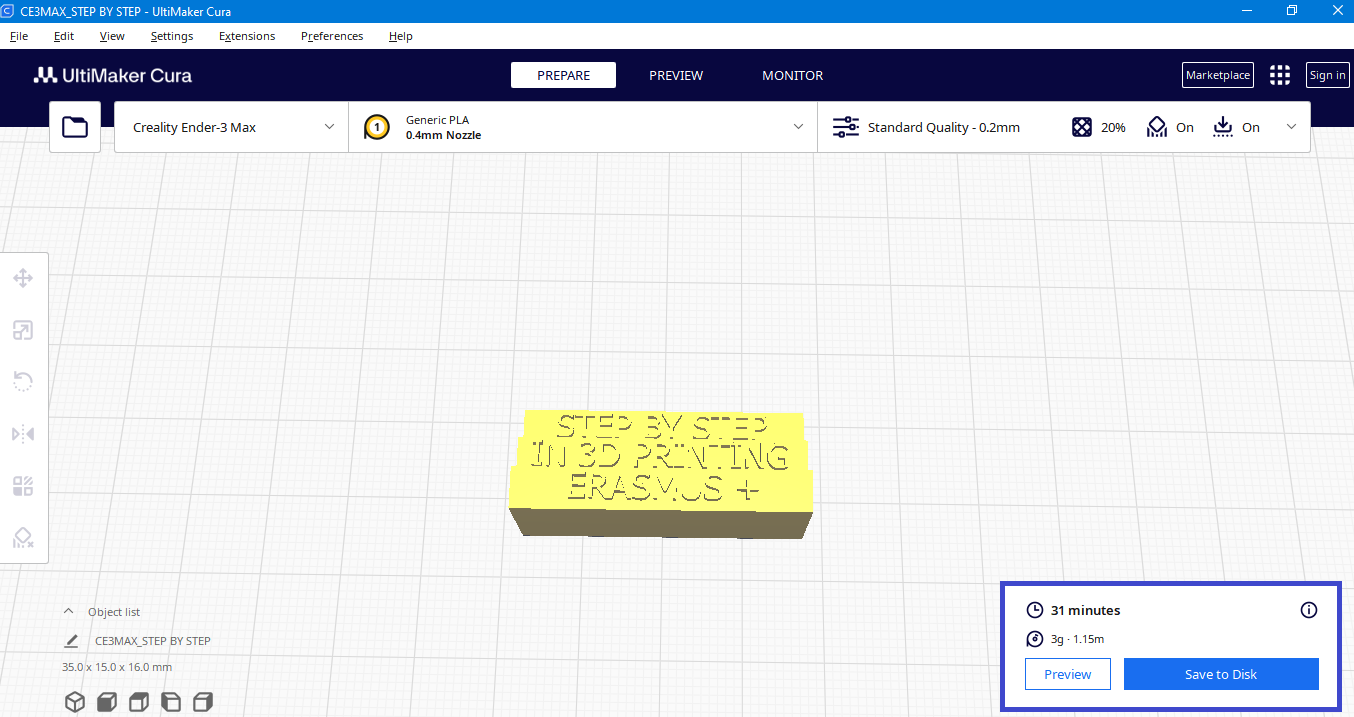
By clicking on slice, the model is divided into layers and is ready for printing. You are shown the duration of printing and how much material will be consumed during printing. The model is converted to G-code and you can save the G-code to your computer or USB stick to transfer it to your 3D printer.
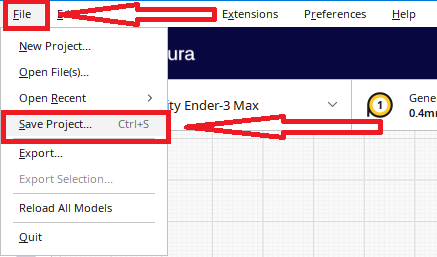
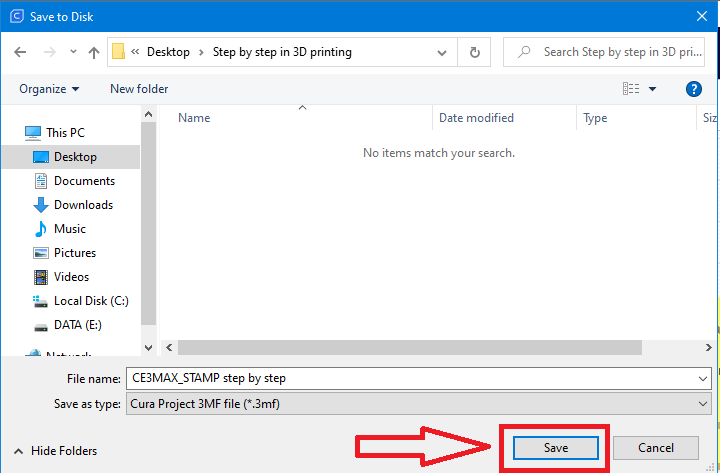
Note: You cannot open the G-code in Cura, so if you want to save the project with all changes, save it with the Save Project option located in the Top menu bar-File-Save project.
Before saving the G code from the model, it is recommended to review the print simulation to avoid errors that may occur during the setup.
Preview
The preview option gives you the option to preview the printout. To be able to preview the printout you need to make a slice.
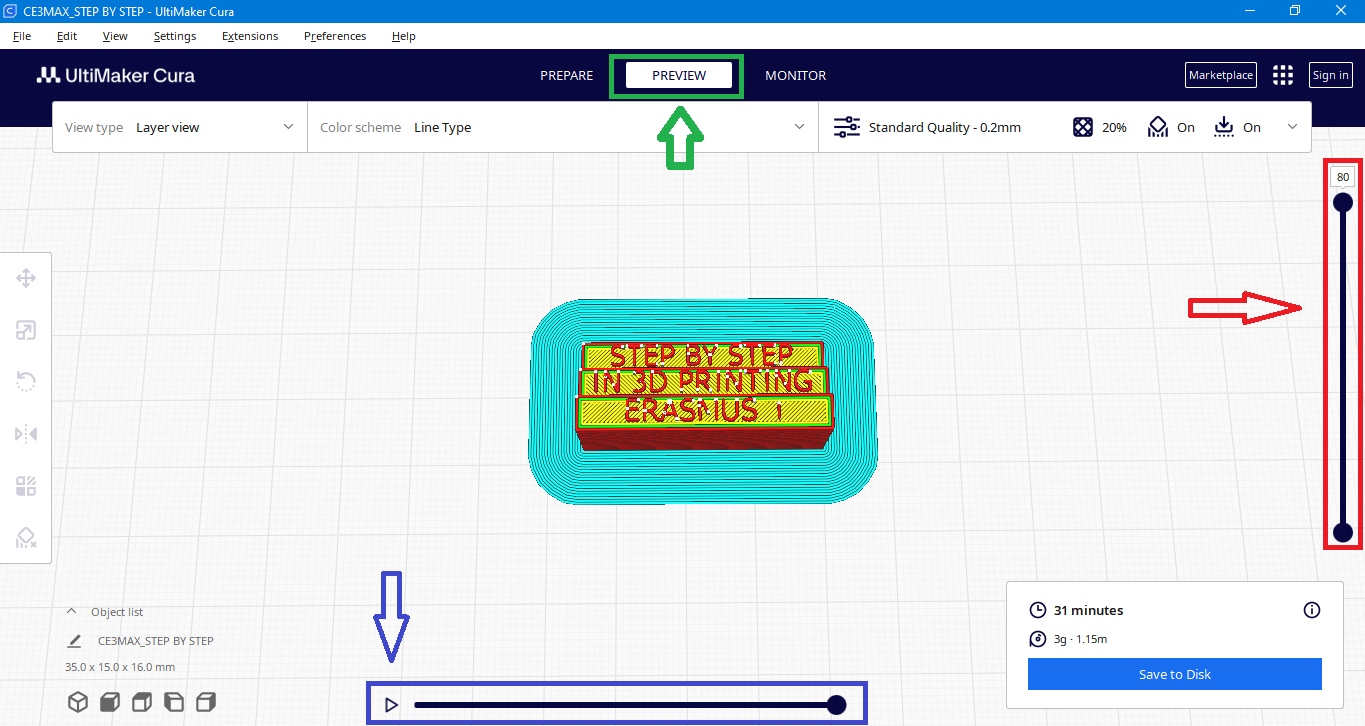
*On the right side (marked with red color in this manual) is a scale for each layer of the print, allowing you to always know which layer you are reviewing.
*On the bottom (marked with blue color in this manual) is the play button to turn on the preview (simulation)
You can always go back to print settings if you want to adjust some settings, but with each change you lose the ability to preview, which means you have to click slice again.
Preview colors
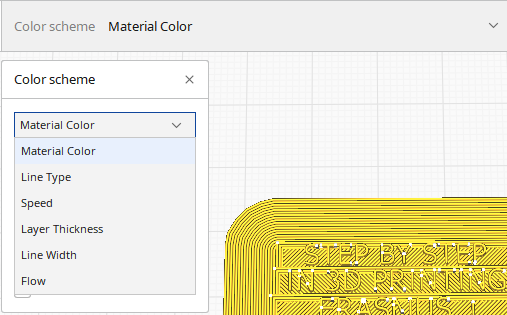 |
In this field you can change the colors of the preview
-such as choosing a support color, -choosing a color for exterior walls, -viewing the speed of different layers |
If you are satisfied with the results, you can save the G code and upload it to the 3D printer. Enjoy printing
Exampels
4.1. Example 1
Following the handbook, make the settings for the model ” STAMP”:
The 3D printer we print with is: Ender 3 Max
Material: PLA 1.75mm
1. Import the 3D model
2. Size of the model should be 60x40x5 mm.
3. The model does not need to be supported
4. Infill 20%
5. Make the model to be used as a stamp
6. Save the project
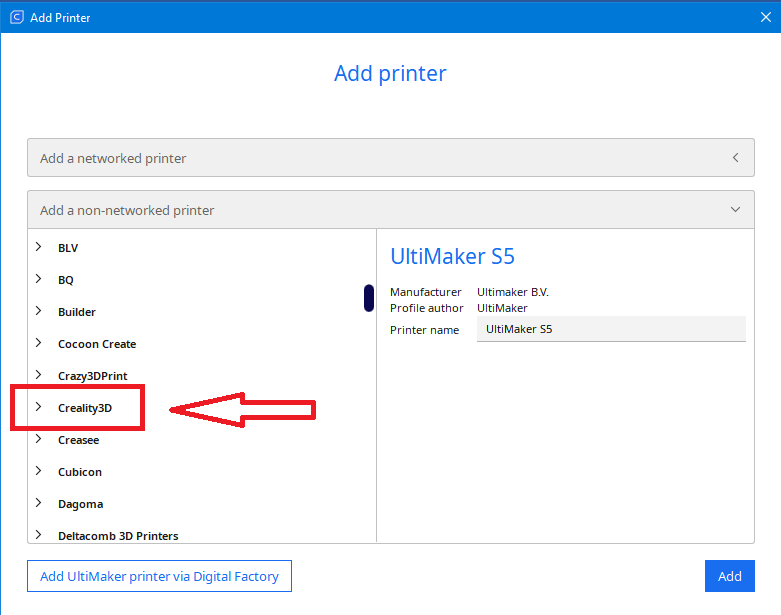
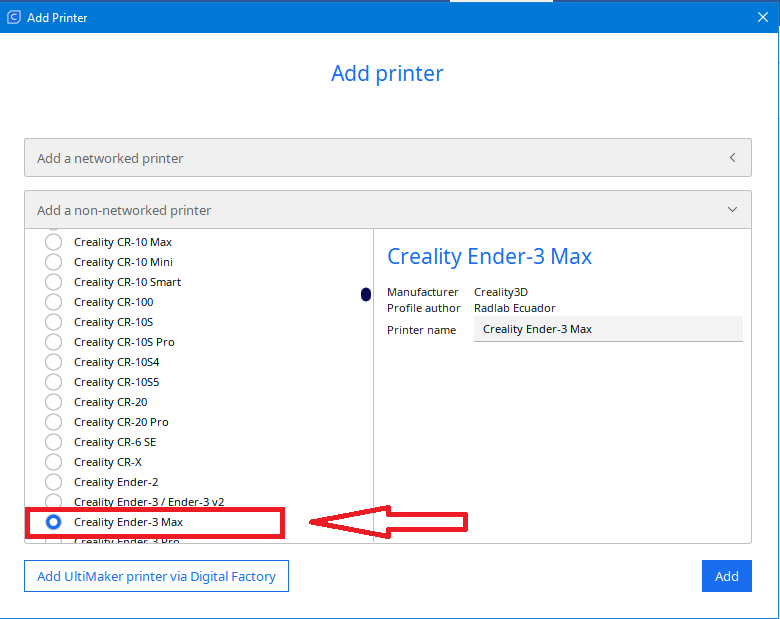
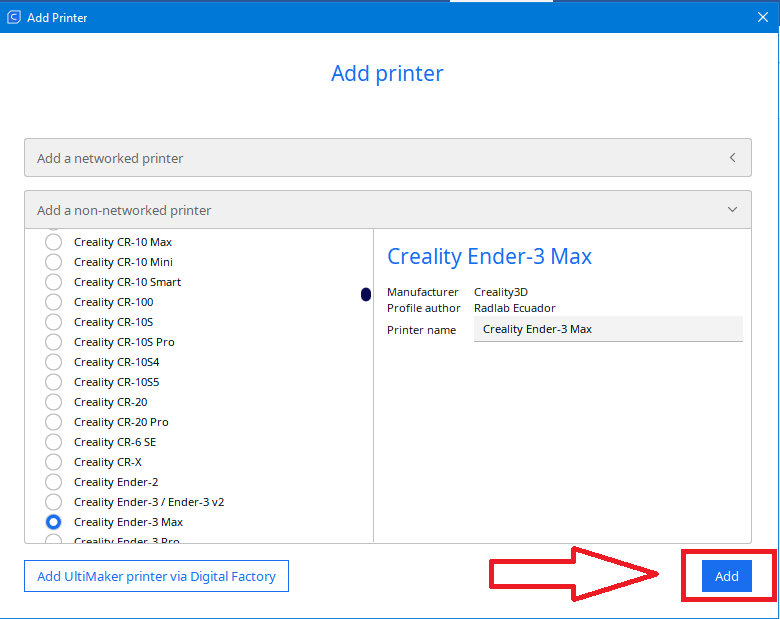
First we choose the printer with which we are going to print the model, in this case Creality Ender 3 Max
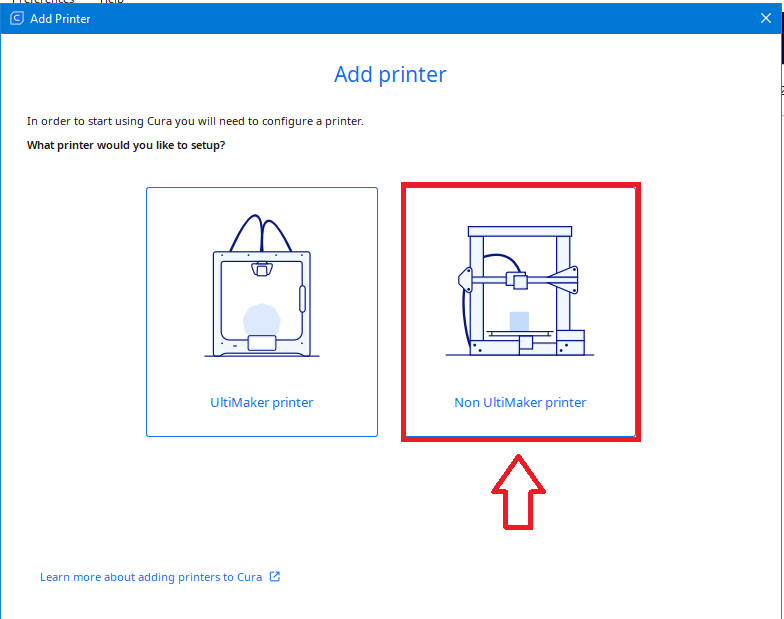
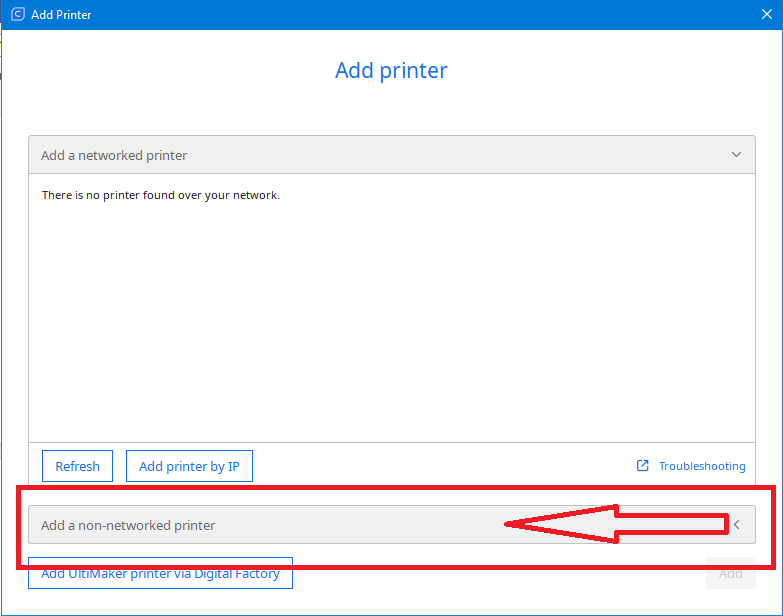
Our printer is not on the list, we need to add it with the Add printer command.
Step 1
A window will open where we have to choose a printer that is not manufactured by Ultimaker.
Step 2
Step 3
Step 4
Step 5
Step 6
Step 7
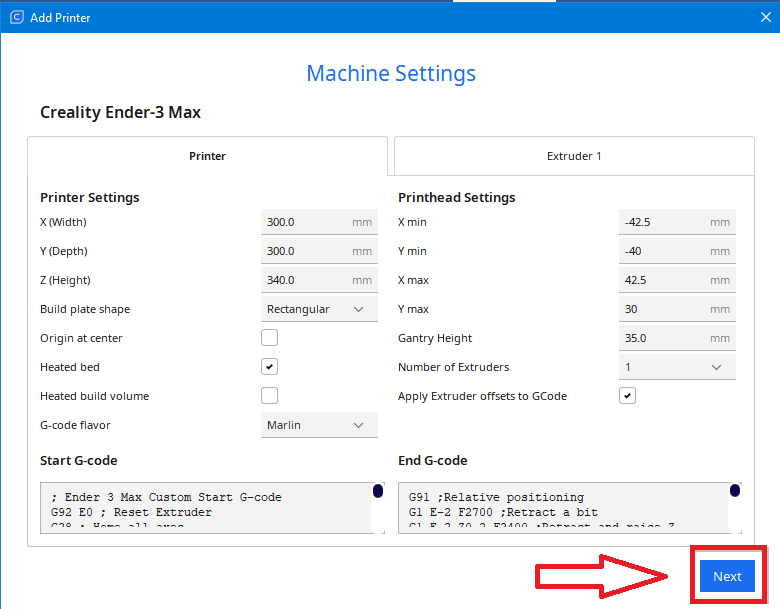
Step 7 completes the selection of a 3D printer
Next , we need to choose the material (PLA) that we are going to use for printing the object:
Step 8


- Now we can import the model we want to adjust and print
Step 9
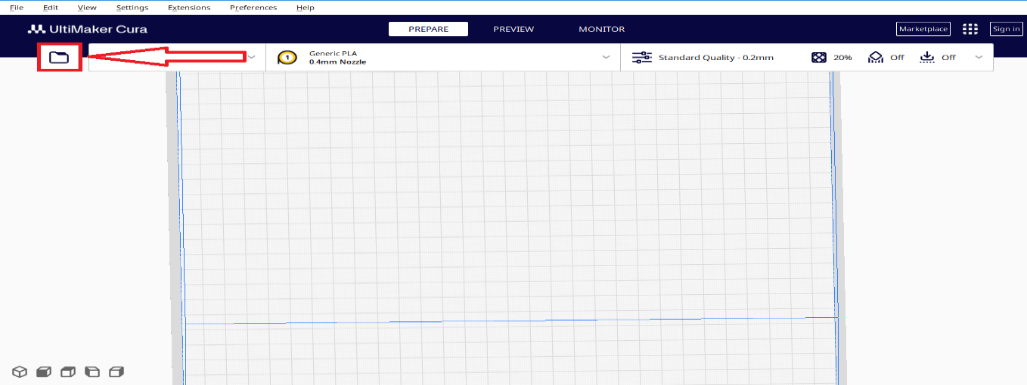
Step 10
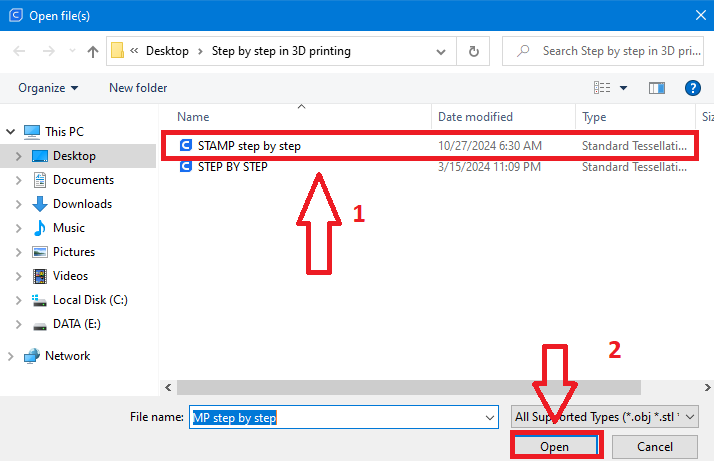
- Setting the dimensions of the object 60x40x5mm
Step 11
Select the model and choose the SCALE command
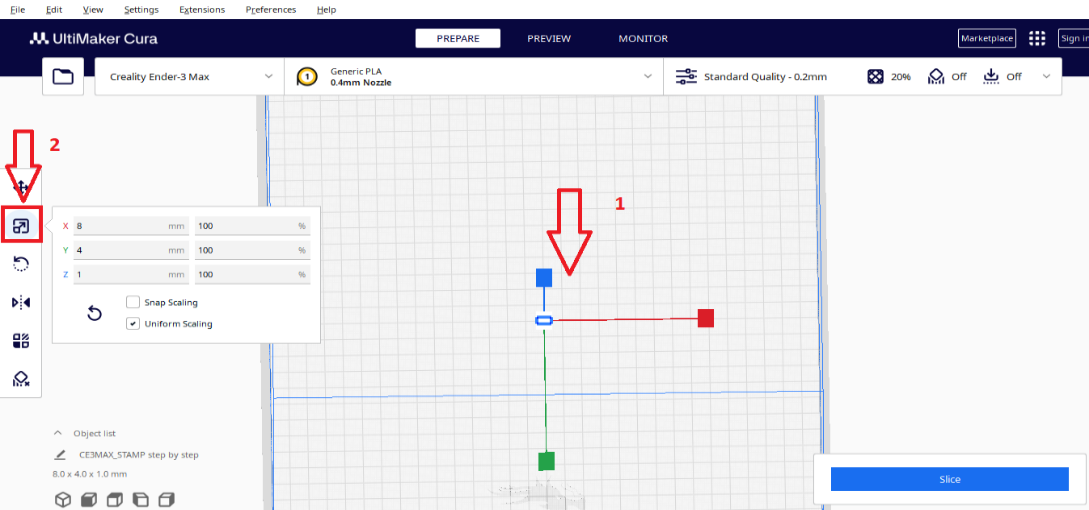
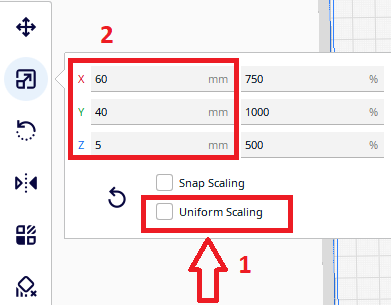
Step 12
Unselect uniform scaling and enter the desired dimensions for x, y and z
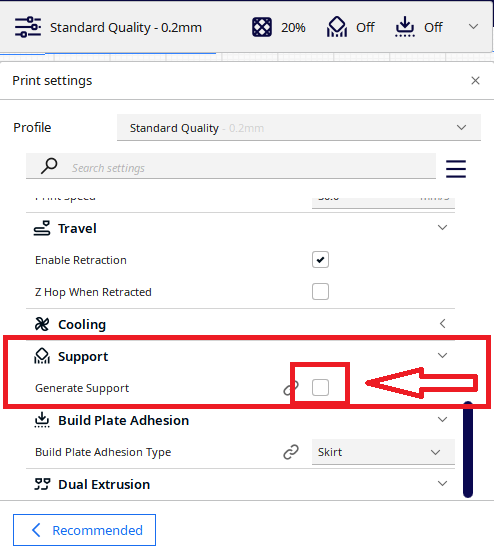
- Turn off the support option
Step 13
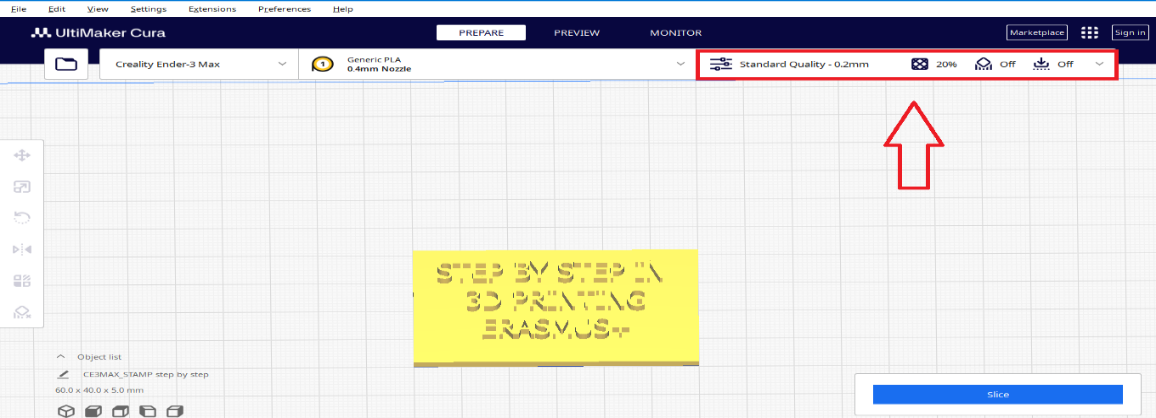
Step 14
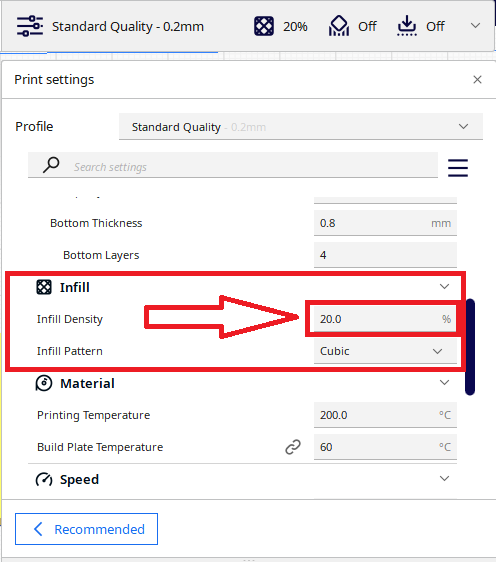
- Мodel infill 20%
Step 15
- Making the model suitable for use as a stamp.
Step 16
- Saving the project
Step 18
4.2. Example 2
Following the handbook, make the settings for the model “Figure 1”:
The 3D printer used is: Ender 3 Max
Material: PLA 1.75mm
- Import the 3D model
- Size of the 1 figure should be 10mm wide and 20mm high.
- Мake 4 figures that will be arranged on a grid.
- Мove the figures to the lower left corner of the platform.
- Make the printing parameters in conditions where there is movement of people near the printer
- Generate G code
Since we have selected the same printer and material in the previous task, we can move on to the parameters of the model
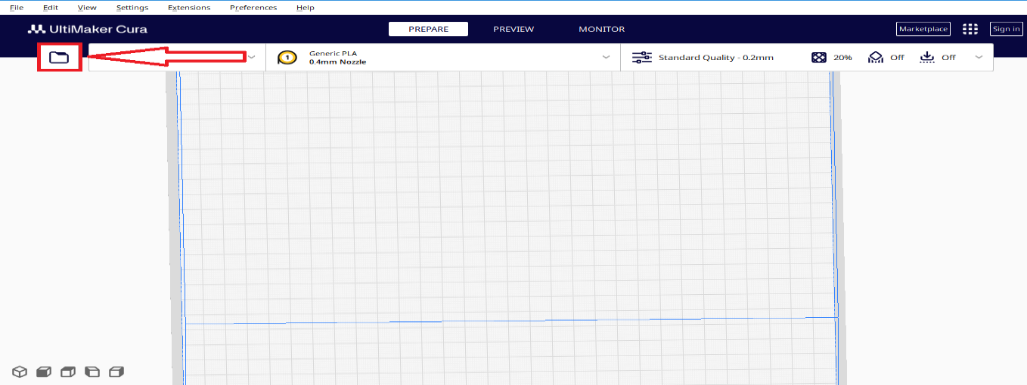
- Import the 3D model
Step 1
Step 2
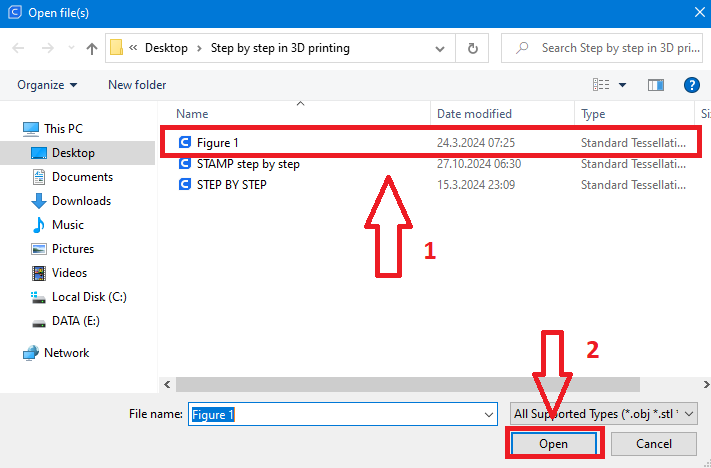
We have imported the model but we see that the model is lying down, we need to straighten it
Select the model and click on the Rotate command – select face to align to the build plate, than select the bottom of the model.
Step 3
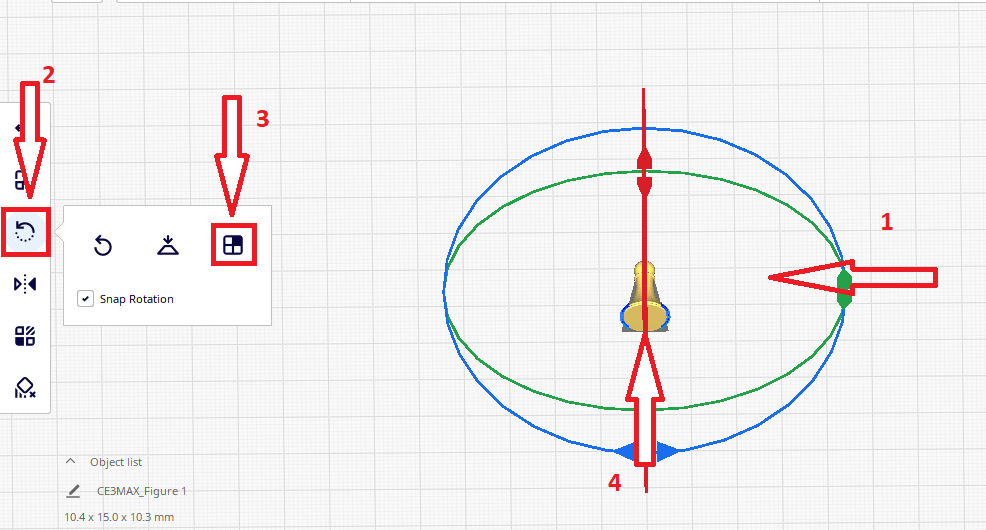
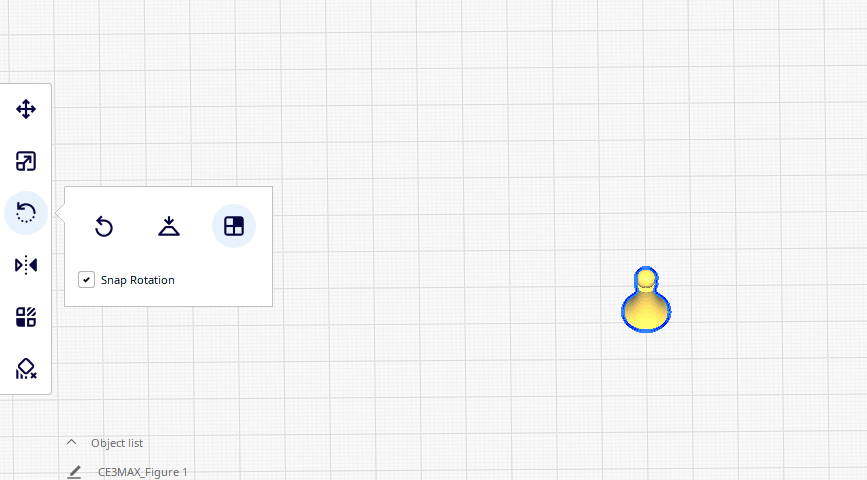
Now we can move on to the next step.
- The size of the 1 figure should be 10mm wide and 20mm high.
Step 4
Select the model, click the Scale command and change the X,Y and Z values
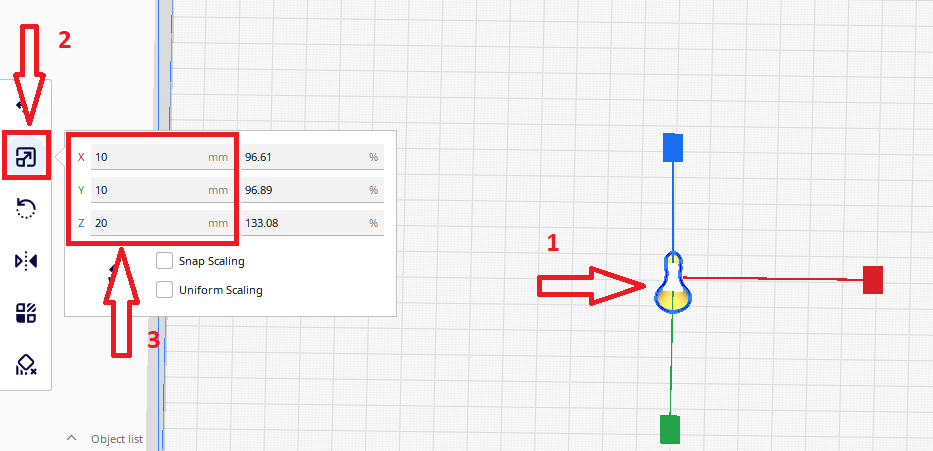
- Мake 4 figures that will be arranged on a grid.
Step 5
Right-click on the model and choose the multiply selected command
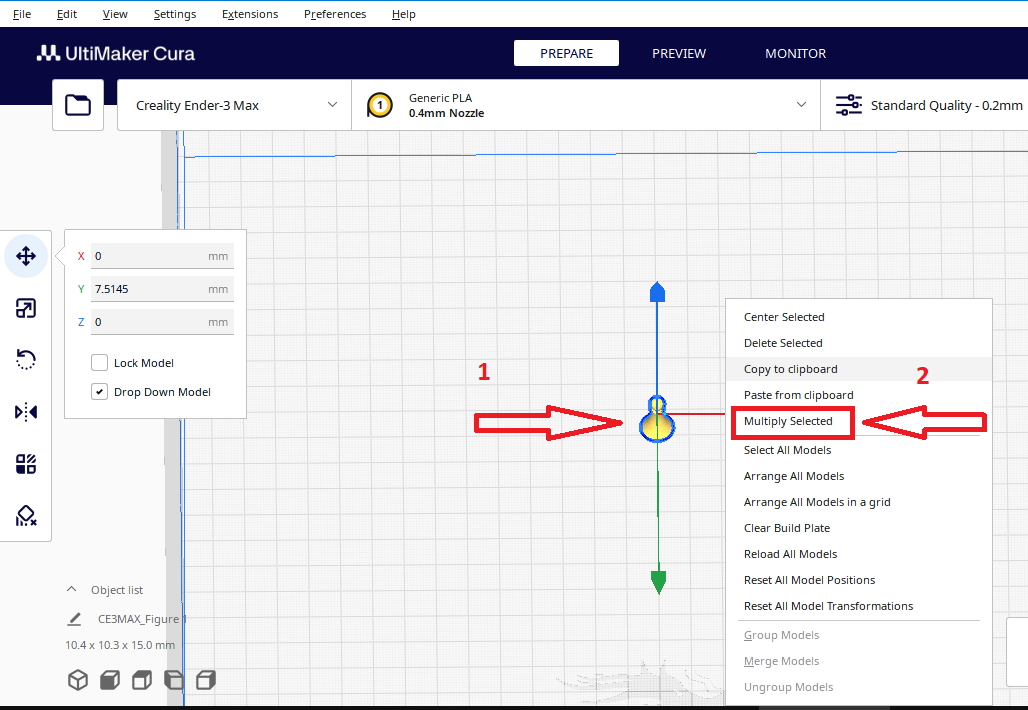
Step 6
Select the number of copies (in our case 3), select the field grid placement and press OK
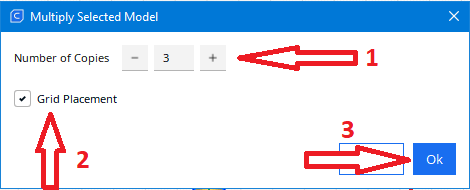
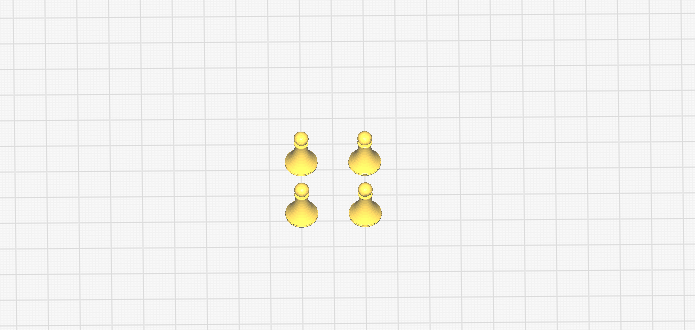
- Мove the figures to the lower left corner of the platform.
Step 7
Right-click anywhere on the field and click select all models

Step 8
First click on the green arrow and drag down to move the models down, then on the red arrow and drag to the left, in order to move the models to the left.
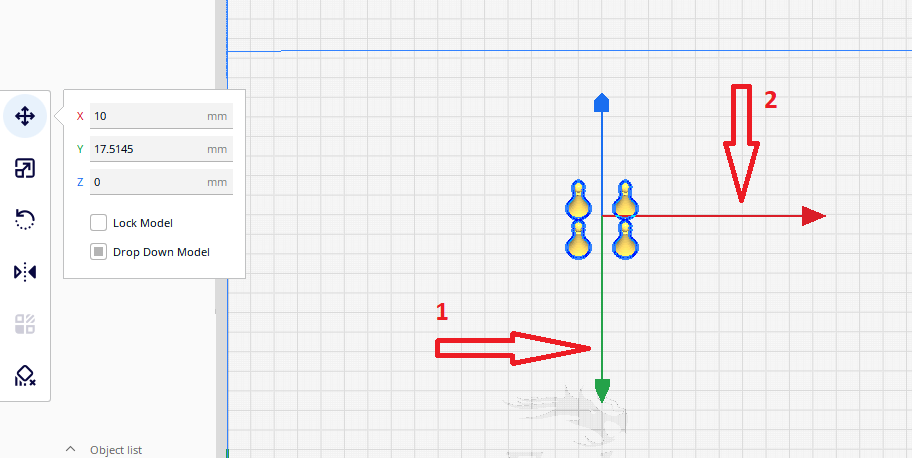
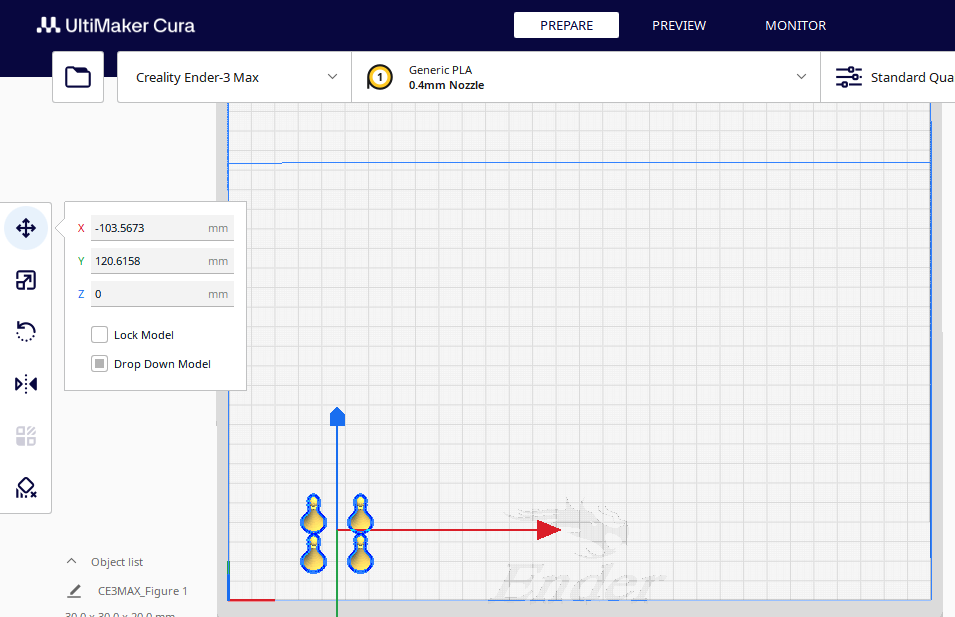
- Make the printing parameters in conditions where there is movement of people near the printer
Because when we print, a larger number of people will pass by the printer, so they will create a larger air flow, that can detach the object from the printing platform. To avoid detachment we need to raise the printing temperature and the Build Plate temperature as well as turn on the build plate adhesion.
Step 9
Printing temperature: 220°C Build Plate Temperature: 80°C
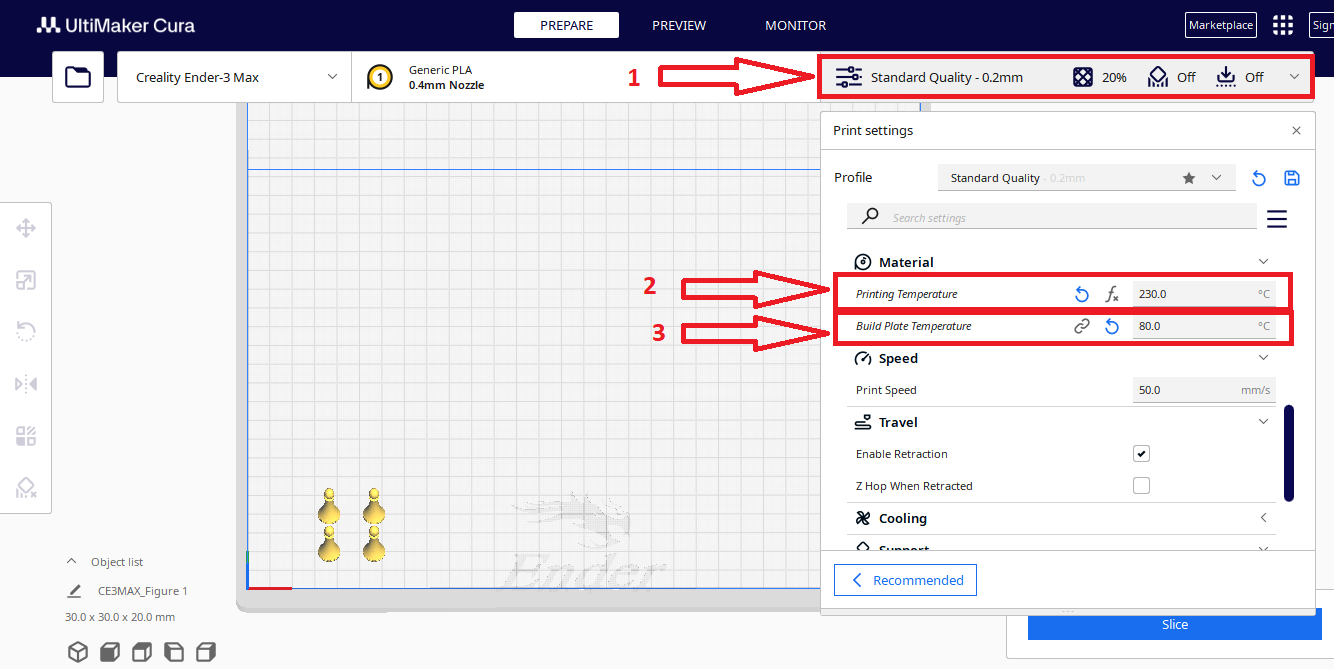
Step 10
Select the Brim option in the Build Plate Adhesion section
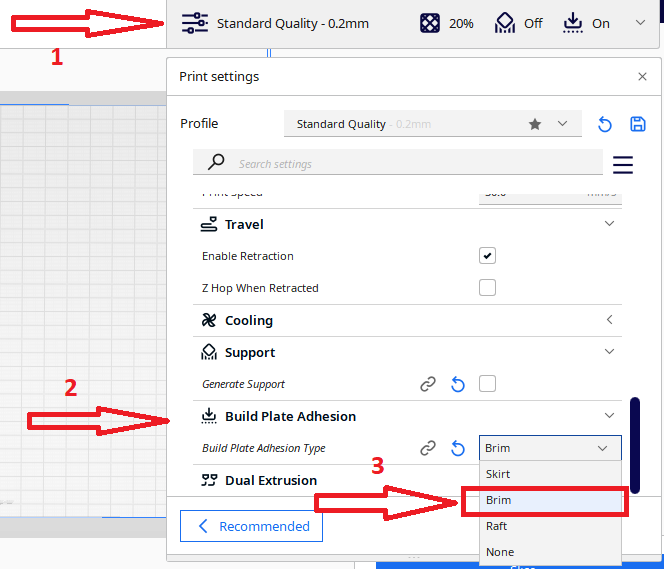
- Generate G code
After making all the settings, click on Slice to generate G-code
Step 11
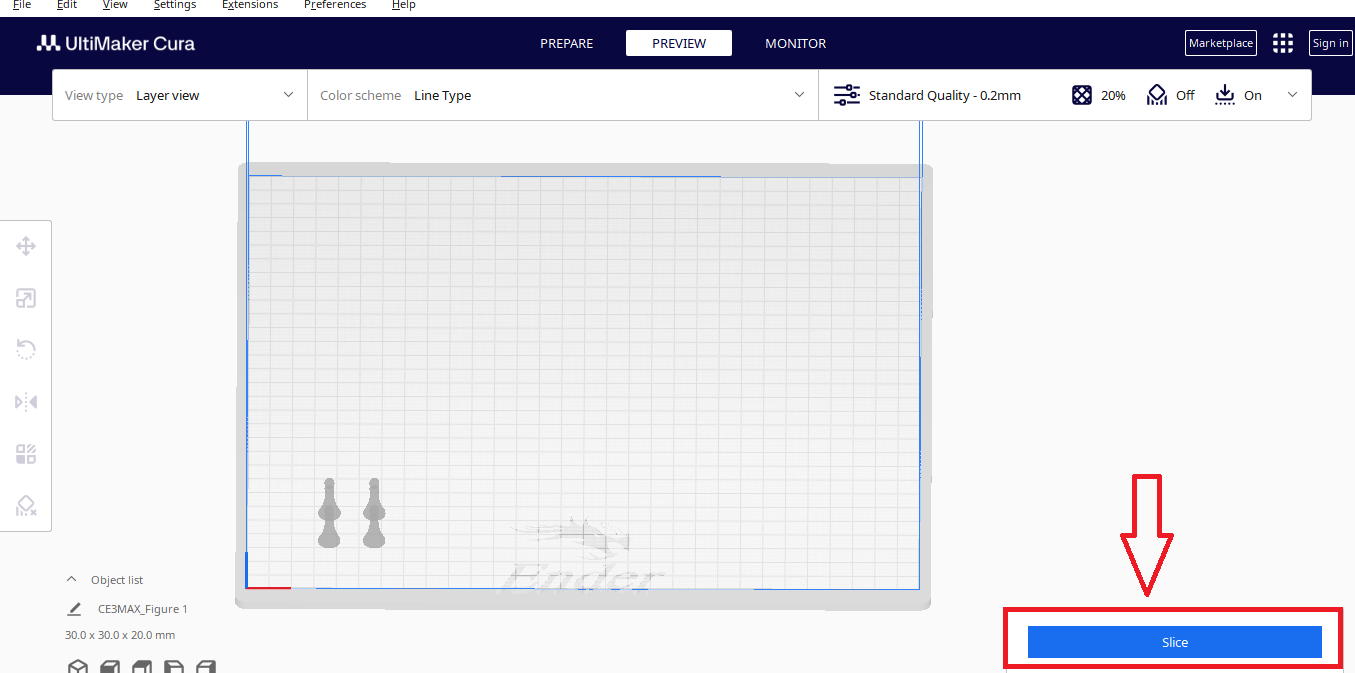
Step 12
Click save to Disk and save the G-Code under a name of your choice
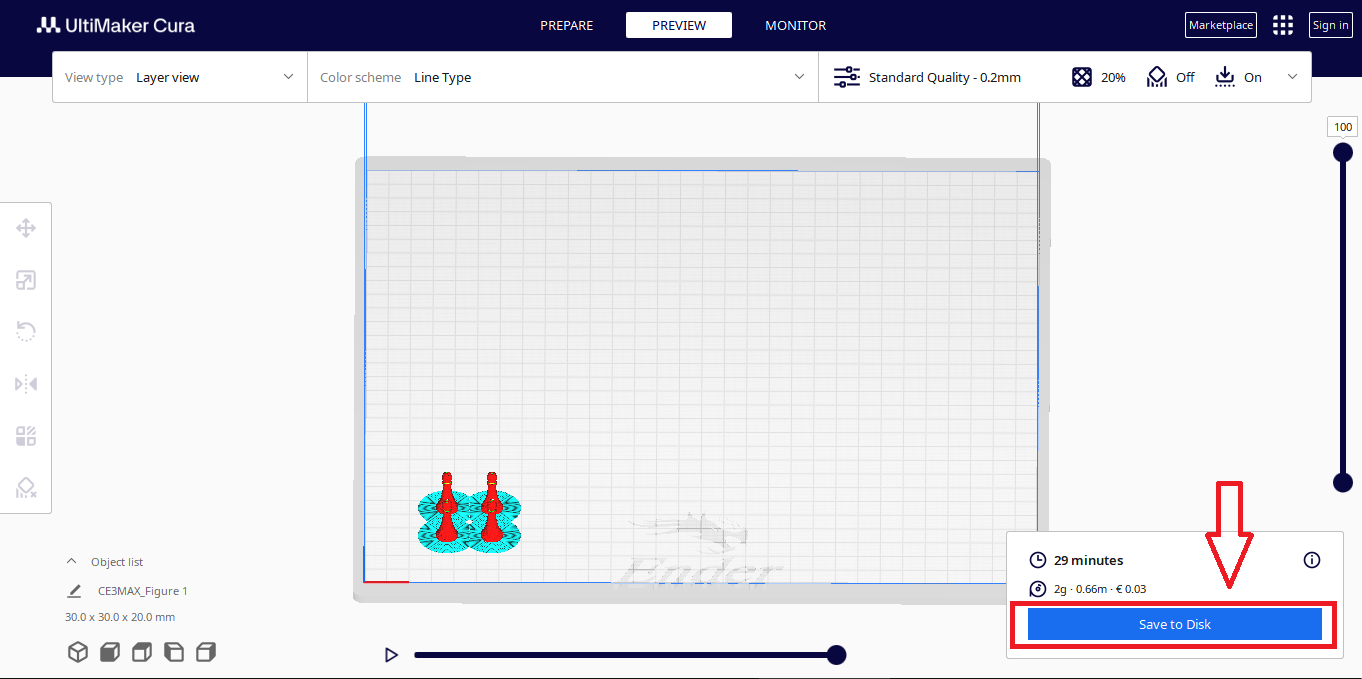
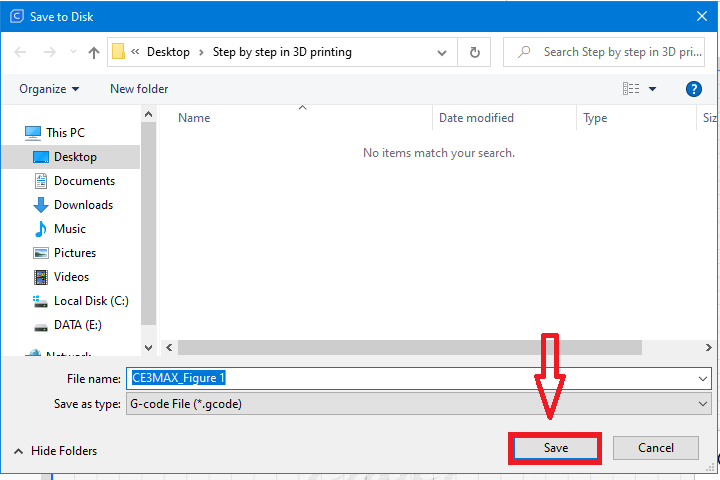
Now you can enter the G-code into the printer and start printing.
